Categories
Offsites

Progress and Challenges in Long-Form Open-Domain Question Answering

Open-domain long-form question answering (LFQA) is a fundamental challenge in natural language processing (NLP) that involves retrieving documents relevant to a given question and using them to generate an elaborate paragraph-length answer. While there has been remarkable recent progress in factoid open-domain question answering (QA), where a short phrase or entity is enough to answer a question, much less work has been done in the area of long-form question answering. LFQA is nevertheless an important task, especially because it provides a testbed to measure the factuality of generative text models. But, are current benchmarks and evaluation metrics really suitable for making progress on LFQA?

In “Hurdles to Progress in Long-form Question Answering” (to appear at NAACL 2021), we present a new system for open-domain long-form question answering that leverages two recent advances in NLP: 1) state-of-the-art sparse attention models, such as Routing Transformer (RT), which allow attention-based models to scale to long sequences, and 2) retrieval-based models, such as REALM, which facilitate retrievals of Wikipedia articles related to a given query. To encourage more factual grounding, our system combines information from several retrieved Wikipedia articles related to the given question before generating an answer. It achieves a new state of the art on ELI5, the only large-scale publicly available dataset for long-form question answering.

However, while our system tops the public leaderboard, we discover several troubling trends with the ELI5 dataset and its associated evaluation metrics. In particular, we find 1) little evidence that models actually use the retrievals on which they condition; 2) that trivial baselines (e.g., input copying) beat modern systems, like RAG / BART+DPR; and 3) that there is a significant train/validation overlap in the dataset. Our paper suggests mitigation strategies for each of these issues.

Text Generation
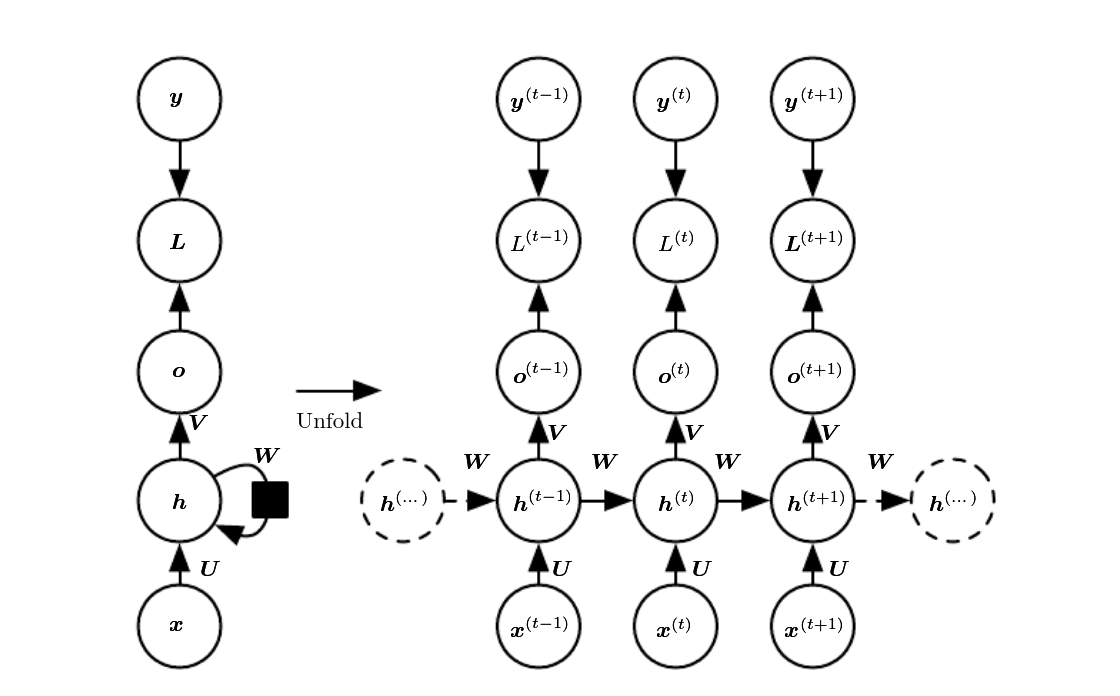
The main workhorse of NLP models is the Transformer architecture, in which each token in a sequence attends to every other token in a sequence, resulting in a model that scales quadratically with sequence length. The RT model introduces a dynamic, content-based sparse attention mechanism that reduces the complexity of attention in the Transformer model from n2to n1.5, where n is the sequence length, which enables it to scale to long sequences. This allows each word to attend to other relevant words anywhere in the entire piece of text, unlike methods such as Transformer-XL where a word can only attend to words in its immediate vicinity.

The key insight of the RT work is that each token attending to every other token is often redundant, and may be approximated by a combination of local and global attention. Local attention allows each token to build up a local representation over several layers of the model, where each token attends to a local neighborhood, facilitating local consistency and fluency. Complementing local attention, the RT model also uses mini-batch k-means clustering to enable each token to attend only to a set of most relevant tokens.

Attention maps for the content-based sparse attention mechanism used in Routing Transformer. The word sequence is represented by the diagonal dark colored squares. In the Transformer model (left), each token attends to every other token. The shaded squares represent the tokens in the sequence to which a given token (the dark square) is attending. The RT model uses both local attention (middle), where tokens attend only to other tokens in their local neighborhood, and routing attention (right), in which a token only attends to clusters of tokens most relevant to it in context. The dark red, green and blue tokens only attend to the corresponding color of lightly shaded tokens.

We pre-train an RT model on the Project Gutenberg (PG-19) data-set with a language modeling objective, i.e, the model learns to predict the next word given all the previous words, so as to be able to generate fluent paragraph long text.

Information Retrieval
To demonstrate the effectiveness of the RT model on the task of LFQA, we combine it with retrievals from REALM. The REALM model (Guu et al. 2020) is a retrieval-based model that uses the maximum inner product search to retrieve Wikipedia articles relevant to a particular query or question. The model was fine-tuned for factoid-based question answering on the Natural Questions dataset. REALM utilizes the BERT model to learn good representations for a question and uses SCANN to retrieve Wikipedia articles that have a high topical similarity with the question representation. This is then trained end-to-end to maximize the log-likelihood on the QA task.

We further improve the quality of REALM retrievals by using a contrastive loss. The idea behind this is to encourage the representation of a question to get close to its ground truth answer and diverge from the other answers in its mini-batch. This ensures that when the system retrieves relevant items using this question representation, it returns articles that are “similar” to ground truth answers. We call this retriever contrastive-REALM or c-REALM.

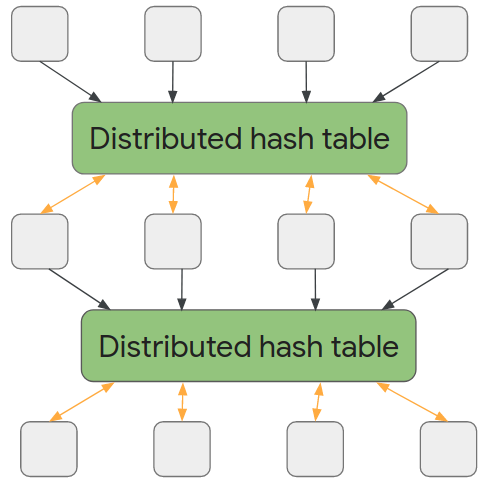
The combined RT + c-REALM system for LFQA.

Evaluation
We test the model on long-form question answering using the ELI5 dataset, which is a part of the KILT benchmark, and is the only publicly available large-scale LFQA dataset. The KILT benchmark measures text retrievals using Precision (R-Prec) and text generation using ROUGE-L. The two scores are combined to give a KILT R-L score, which determines a model’s ranking on the leaderboard. We fine-tune the pre-trained RT model together with retrievals from c-REALM on the ELI5 dataset from KILT.

Our submission tops the KILT leaderboard for long-form question answering on ELI5 with a combined KILT R-L score of 2.36. It improves on the previous leaderboard entry of BART + DPR (KILT R-L score of 1.9), while having a similar number of parameters as the other models on the leaderboard. In terms of text generation quality, we see an improvement of +4.11, +5.78 and +9.14 Rouge-L over T5, BART + DPR and RAG, respectively.

Our results on the KILT leaderboard for long form question answering on ELI5.

Example Generations from the RT Model

  • Q: Why are almost all boats white?

    Boats are generally painted white for obvious reasons, as they are inexpensive and easy to clean. Ships are also often painted to provide a visible visual contrast to the sea. Boats also often have high visibility ports to allow for easy international trade. In addition, many boats have an air-breathing function that makes them easier to spot and stay afloat, which is a good thing if you’re a pirate or trying to get into some country’s waters. Lastly, many ships are built in the last few decades, so they are not as exotic looking as they were thirty years ago. And lastly, many ships are made out of materials that are easy to work with, and so many of them are painted white as a practical matter. There are many, many more reasons for why ships are white, but those are the ones I know of. I’m sure there are many other reasons, but those are the ones I know of. Edit: I forgot to mention that the other answers about visibility and easy to see ports are also true. Ships are painted to appear to be larger, and more expensive. That makes them appear more impressive, and so they are more likely to be bought by people who want to show off their wealth and status.

  • Q: What causes the trail behind jets at high altitude?

    The same thing that causes the clouds you see at the start of a storm to form in the first place. The air pressure changes as the jet moves through the air, causing it to cool down and condense into water droplets. These droplets are in fact a lot bigger than the water droplets in the clouds, so when the plane passes through them, they can cause the air pressure to change, causing the water droplets to condense into clouds. This is what you see when you look at a cloud formation from the ground. In addition to this, when the plane passes through the clouds, it also moves through the air, causing it to change its temperature, causing the water droplets to condense and form clouds. These clouds are often quite large, and can block out the sun. This is what you see when you look at a contrail. Finally, the water vapor that forms at high altitudes is cooled by the air above, and as it cools, it condenses into clouds. This is what you see when you look at a cumulonimbus cloud. These clouds are even larger than the water droplets in the clouds, and they block out the sun.

  • Q: How do shampoo and conditioner work?

    The key ingredients in shampoo and conditioner are usually surfactants, they tend to attract oil from your skin. Shampoo will usually contain an anti-dandruff agent (dandruff is caused by fungi in your skin which cause dandruff). They also contain some moisturizing agents (moisturizers are things that stay in your skin longer and protect your scalp from cleaning), and a lot of anti-dandruff (dandruff is a side effect of high doses of both surfactants and moisturizers) Conditioner will contain moisturizing agents, like a skin moisturizer. They tend to cause oils to be separated from your hair (e.g. wash your hair with conditioner instead of shampoo). They both have a foaming agent that makes them foam up (usually Hydrogen Peroxide). They also have a foaming agent that stops dirt from attaching to your hair. Some conditioner will also suppress the action of the shampoo (to help prevent dirt from attaching to your hair).

  • Q: When glancing at a clock, why does the first second after glancing at it sometimes feel longer than the rest?

    This is known as chronostasis. Your brain gets used to seeing the second hand move after the first, so it ignores the first one. If you were to look at the clock a lot, you’d see the second hand move a lot more than the first, and you’d be able to tell the difference between the second and the first. The second hand will appear to move much slower than the first hand because your brain is used to seeing the second hand move a lot more than the first. If you were to go on a long trip, you’d get used to the second hand moving a lot more than the first, and you’d have no problem telling the difference between the second and the first hand. It’s kind of like how you don’t notice your nose when you’re driving, but if you look at it for a while, you start to notice it. Your brain is just getting used to seeing the nose move a lot more than the other, and it can’t tell the difference between the two. It’s kind of like that with your eyes.

  • Q: Why do Britain and other English empire countries still bow to monarchs? What real purpose does the queen serve?

    Depends what you define as “purpose”. There is no specific purpose for the British monarch – rather, they are figureheads that serve a role. The role is to have a high degree of influence over a country, though the rules of the monarchy can somewhat vary from country to country, and the ceremony of “kissing the royal corpse” does not always involve kissing the monarch. Whether that’s the only reason for the custom, or if it was the only reason, I can’t say, but that’s the reasoning. When the U.K. was in full power, the monarch was a puppet of Parliament, and the powers of the monarch were transferred to the Prime Minister and thus to the Prime Minister’s deputy, who then became the Prime Minister. Since then, Parliament has been able to vote on legislation that goes through the monarch, although they may still act as the monarch’s representative in negotiating treaties, which can have very very deep consequences. The Queen’s role, as a representative of Britain, doesn’t necessarily involve her formal approval of any of the laws or legislation that goes through Parliament, though.

  • Q: What exactly is fire, in detail? How can light and heat come from something we can’t really touch?

    Fire is the chemical reaction of fuel (oxygen) with (what we call) impurities (ash, soot, oil etc). These impurities are created due to a number of things. If you were to study the chemical composition of a log (or a candle) and analyse it you would discover the chemical formula (A, C, and G) which is a simplified version of what actually happens. There is always fuel, and there is always the ash/soot. Wood is made up of mostly carbon and hydrogen and these are the fuels that create the fire. Hydrogen and oxygen are reactive, and they form water (H2O) and CO2 (CO2). If we split a log into smaller pieces, we start to see the process of combustion as it occurs. The carbon is burned, and with the explosion of CO, H2O and H2CO2, we get water and carbon dioxide (mostly). If we smash a log together, we start to see what happens when we also hit another log with another log…imagine smashing two sand castles together. We see how the sand castles and brick castles form and collapse at different rates…then it starts to burn. The smoke, ash and flames are the actual combustion of fuel.

  • Q: What goes on in those tall tower buildings owned by major banks?

    The actual buildings are not there for profit but for show. There are many real world historical buildings that have little to no effect other than being a symbol of an economic entity or symbol of an era or location, and nothing more. For example look at Sears, Sears didn’t care what went on inside, it was all about the _appearance_ of its location, the prestige of the location, the facilities and so on. It didn’t care about how long it took it to operate, it was about how much people would pay to go see it. Sears was a landmark as a cultural movement and other big companies followed suit, so if you want to see a building you’ve never seen before, you have to go see Sears, just like you have to see a Toyota Camry for Toyota Camry. They used to be all about building new factories, some of them if I recall, but now that they’re bigger, that means that more factory jobs are coming to them. You’ve probably seen them in stores as stores where people buy and sell stuff, so there aren’t that many places for them to come from. Instead, it’s just for show, a symbol of rich people.

Hurdles Towards Progress in LFQA
However, while the RT system described here tops the public leaderboard, a detailed analysis of the model and the ELI5 dataset reveal some concerning trends.

  • Many held-out questions are paraphrased in the training set. Best answer to similar train questions gets 27.4 ROUGE-L.

  • Simply retrieving answers to random unrelated training questions yields relatively high ROUGE-L, while actual gold answers underperform generations.

  • Conditioning answer generation on random documents instead of relevant ones does not measurably impact its factual correctness. Longer outputs get higher ROUGE-L.

We find little to no evidence that the model is actually grounding its text generation in the retrieved documents — fine-tuning an RT model with random retrievals from Wikipedia (i.e., random retrieval + RT) performs nearly as well as the c-REALM + RT model (24.2 vs 24.4 ROUGE-L). We also find significant overlap in the training, validation and test sets of ELI5 (with several questions being paraphrases of each other), which may eliminate the need for retrievals. The KILT benchmark measures the quality of retrievals and generations separately, without making sure that the text generation actually use the retrievals.

Trivial baselines get higher Rouge-L scores than RAG and BART + DPR.

Moreover, we find issues with the Rouge-L metric used to evaluate the quality of text generation, with trivial nonsensical baselines, such as a Random Training Set answer and Input Copying, achieving relatively high Rouge-L scores (even beating BART + DPR and RAG).

Conclusion
We proposed a system for long form-question answering based on Routing Transformers and REALM, which tops the KILT leaderboard on ELI5. However, a detailed analysis reveals several issues with the benchmark that preclude using it to inform meaningful modelling advances. We hope that the community works together to solve these issues so that researchers can climb the right hills and make meaningful progress in this challenging but important task.

Acknowledgments
The Routing Transformer work has been a team effort involving Aurko Roy, Mohammad Saffar, Ashish Vaswani and David Grangier. The follow-up work on open-domain long-form question answering has been a collaboration involving Kalpesh Krishna, Aurko Roy and Mohit Iyyer. We wish to thank Vidhisha Balachandran, Niki Parmar and Ashish Vaswani for several helpful discussions, and the REALM team (Kenton Lee, Kelvin Guu, Ming-Wei Chang and Zora Tung) for help with their codebase and several useful discussions, which helped us improve our experiments. We are grateful to Tu Vu for help with the QQP classifier used to detect paraphrases in ELI5 train and test sets. We thank Jules Gagnon-Marchand and Sewon Min for suggesting useful experiments on checking ROUGE-L bounds. Finally we thank Shufan Wang, Andrew Drozdov, Nader Akoury and the rest of the UMass NLP group for helpful discussions and suggestions at various stages in the project.

Categories
Offsites

Leveraging Machine Learning for Game Development

Over the years, online multiplayer games have exploded in popularity, captivating millions of players across the world. This popularity has also exponentially increased demands on game designers, as players expect games to be well-crafted and balanced — after all, it’s no fun to play a game where a single strategy beats all the rest.

In order to create a positive gameplay experience, game designers typically tune the balance of a game iteratively:

  1. Stress-test through thousands of play-testing sessions from test users
  2. Incorporate feedback and re-design the game
  3. Repeat 1 & 2 until both the play-testers and game designers are satisfied

This process is not only time-consuming but also imperfect — the more complex the game, the easier it is for subtle flaws to slip through the cracks. When games often have many different roles that can be played, with dozens of interconnecting skills, it makes it all the more difficult to hit the right balance.

Today, we present an approach that leverages machine learning (ML) to adjust game balance by training models to serve as play-testers, and demonstrate this approach on the digital card game prototype Chimera, which we’ve previously shown as a testbed for ML-generated art. By running millions of simulations using trained agents to collect data, this ML-based game testing approach enables game designers to more efficiently make a game more fun, balanced, and aligned with their original vision.

Chimera
We developed Chimera as a game prototype that would heavily lean on machine learning during its development process. For the game itself, we purposefully designed the rules to expand the possibility space, making it difficult to build a traditional hand-crafted AI to play the game.

The gameplay of Chimera revolves around the titular chimeras, creature mash-ups that players aim to strengthen and evolve. The objective of the game is to defeat the opponent’s chimera. These are the key points in the game design:

  • Players may play:
    • creatures, which can attack (through their attack stat) or be attacked (against their health stat), or
    • spells, which produce special effects.
  • Creatures are summoned into limited-capacity biomes, which are placed physically on the board space. Each creature has a preferred biome and will take repeated damage if placed on an incorrect biome or a biome that is over capacity.
  • A player controls a single chimera, which starts off in a basic “egg” state and can be evolved and strengthened by absorbing creatures. To do this, the player must also acquire a certain amount of link energy, which is generated from various gameplay mechanics.
  • The game ends when a player has successfully brought the health of the opponent’s chimera to 0.

Learning to Play Chimera
As an imperfect information card game with a large state space, we expected Chimera to be a difficult game for an ML model to learn, especially as we were aiming for a relatively simple model. We used an approach inspired by those used by earlier game-playing agents like AlphaGo, in which a convolutional neural network (CNN) is trained to predict the probability of a win when given an arbitrary game state. After training an initial model on games where random moves were chosen, we set the agent to play against itself, iteratively collecting game data, that was then used to train a new agent. With each iteration, the quality of the training data improved, as did the agent’s ability to play the game.

The ML agent’s performance against our best hand-crafted AI as training progressed. The initial ML agent (version 0) picked moves randomly.

For the actual game state representation that the model would receive as input, we found that passing an “image” encoding to the CNN resulted in the best performance, beating all benchmark procedural agents and other types of networks (e.g. fully connected). The chosen model architecture is small enough to run on a CPU in reasonable time, which allowed us to download the model weights and run the agent live in a Chimera game client using Unity Barracuda.

An example game state representation used to train the neural network.
In addition to making decisions for the game AI, we also used the model to display the estimated win probability for a player over the course of the game.

Balancing Chimera
This approach enabled us to simulate millions more games than real players would be capable of playing in the same time span. After collecting data from the games played by the best-performing agents, we analyzed the results to find imbalances between the two of the player decks we had designed.

First, the Evasion Link Gen deck was composed of spells and creatures with abilities that generated extra link energy used to evolve a player’s chimera. It also contained spells that enabled creatures to evade attacks. In contrast, the Damage-Heal deck contained creatures of variable strength with spells that focused on healing and inflicting minor damage. Although we had designed these decks to be of equal strength, the Evasion Link Gen deck was winning 60% of the time when played against the Damage-Heal deck.

When we collected various stats related to biomes, creatures, spells, and chimera evolutions, two things immediately jumped out at us:

  1. There was a clear advantage in evolving a chimera — the agent won a majority of the games where it evolved its chimera more than the opponent did. Yet, the average number of evolves per game did not meet our expectations. To make it more of a core game mechanic, we wanted to increase the overall average number of evolves while keeping its usage strategic.
  2. The T-Rex creature was overpowered. Its appearances correlated strongly with wins, and the model would always play the T-Rex regardless of penalties for summoning into an incorrect or overcrowded biome.

From these insights, we made some adjustments to the game. To emphasize chimera evolution as a core mechanism in the game, we decreased the amount of link energy required to evolve a chimera from 3 to 1. We also added a “cool-off” period to the T-Rex creature, doubling the time it took to recover from any of its actions.

Repeating our ‘self-play’ training procedure with the updated rules, we observed that these changes pushed the game in the desired direction — the average number of evolves per game increased, and the T-Rex’s dominance faded.

One example comparison of the T-Rex’s influence before and after balancing. The charts present the number of games won (or lost) when a deck initiates a particular spell interaction (e.g., using the “Dodge” spell to benefit a T-Rex). Left: Before the changes, the T-Rex had a strong influence in every metric examined — highest survival rate, most likely to be summoned ignoring penalties, most absorbed creature during wins. Right: After the changes, the T-Rex was much less overpowered.

By weakening the T-Rex, we successfully reduced the Evasion Link Gen deck’s reliance on an overpowered creature. Even so, the win ratio between the decks remained at 60/40 rather than 50/50. A closer look at the individual game logs revealed that the gameplay was often less strategic than we would have liked. Searching through our gathered data again, we found several more areas to introduce changes in.

To start, we increased the starting health of both players as well as the amount of health that healing spells could replenish. This was to encourage longer games that would allow a more diverse set of strategies to flourish. In particular, this enabled the Damage-Heal deck to survive long enough to take advantage of its healing strategy. To encourage proper summoning and strategic biome placement, we increased the existing penalties on playing creatures into incorrect or overcrowded biomes. And finally, we decreased the gap between the strongest and weakest creatures through minor attribute adjustments.

New adjustments in place, we arrived at the final game balance stats for these two decks:

Deck Avg # evolves per game    
(before → after)    
Win % (1M games)
(before → after)
Evasion Link Gen     1.54 → 2.16     59.1% → 49.8%
Damage Heal 0.86 → 1.76     40.9% → 50.2%

Conclusion
Normally, identifying imbalances in a newly prototyped game can take months of playtesting. With this approach, we were able to not only discover potential imbalances but also introduce tweaks to mitigate them in a span of days. We found that a relatively simple neural network was sufficient to reach high level performance against humans and traditional game AI. These agents could be leveraged in further ways, such as for coaching new players or discovering unexpected strategies. We hope this work will inspire more exploration in the possibilities of machine learning for game development.

Acknowledgements
This project was conducted in collaboration with many people. Thanks to Ryan Poplin, Maxwell Hannaman, Taylor Steil, Adam Prins, Michal Todorovic, Xuefan Zhou, Aaron Cammarata, Andeep Toor, Trung Le, Erin Hoffman-John, and Colin Boswell. Thanks to everyone who contributed through playtesting, advising on game design, and giving valuable feedback.

Categories
Offsites

torch time series, final episode: Attention

This is the final post in a four-part introduction to time-series forecasting with torch. These posts have been the story of a quest for multiple-step prediction, and by now, we’ve seen three different approaches: forecasting in a loop, incorporating a multi-layer perceptron (MLP), and sequence-to-sequence models. Here’s a quick recap.

  • As one should when one sets out for an adventurous journey, we started with an in-depth study of the tools at our disposal: recurrent neural networks (RNNs). We trained a model to predict the very next observation in line, and then, thought of a clever hack: How about we use this for multi-step prediction, feeding back individual predictions in a loop? The result , it turned out, was quite acceptable.

  • Then, the adventure really started. We built our first model “natively” for multi-step prediction, relieving the RNN a bit of its workload and involving a second player, a tiny-ish MLP. Now, it was the MLP’s task to project RNN output to several time points in the future. Although results were pretty satisfactory, we didn’t stop there.

  • Instead, we applied to numerical time series a technique commonly used in natural language processing (NLP): sequence-to-sequence (seq2seq) prediction. While forecast performance was not much different from the previous case, we found the technique to be more intuitively appealing, since it reflects the causal relationship between successive forecasts.

Today we’ll enrich the seq2seq approach by adding a new component: the attention module. Originally introduced around 20141, attention mechanisms have gained enormous traction, so much so that a recent paper title starts out “Attention is Not All You Need”2.

The idea is the following.

In the classic encoder-decoder setup, the decoder gets “primed” with an encoder summary just a single time: the time it starts its forecasting loop. From then on, it’s on its own. With attention, however, it gets to see the complete sequence of encoder outputs again every time it forecasts a new value. What’s more, every time, it gets to zoom in on those outputs that seem relevant for the current prediction step.

This is a particularly useful strategy in translation: In generating the next word, a model will need to know what part of the source sentence to focus on. How much the technique helps with numerical sequences, in contrast, will likely depend on the features of the series in question.

Data input

As before, we work with vic_elec, but this time, we partly deviate from the way we used to employ it. With the original, bi-hourly dataset, training the current model takes a long time, longer than readers will want to wait when experimenting. So instead, we aggregate observations by day. In order to have enough data, we train on years 2012 and 2013, reserving 2014 for validation as well as post-training inspection.

vic_elec_daily <- vic_elec %>%
  select(Time, Demand) %>%
  index_by(Date = date(Time)) %>%
  summarise(
    Demand = sum(Demand) / 1e3) 

elec_train <- vic_elec_daily %>% 
  filter(year(Date) %in% c(2012, 2013)) %>%
  as_tibble() %>%
  select(Demand) %>%
  as.matrix()

elec_valid <- vic_elec_daily %>% 
  filter(year(Date) == 2014) %>%
  as_tibble() %>%
  select(Demand) %>%
  as.matrix()

elec_test <- vic_elec_daily %>% 
  filter(year(Date) %in% c(2014), month(Date) %in% 1:4) %>%
  as_tibble() %>%
  select(Demand) %>%
  as.matrix()

train_mean <- mean(elec_train)
train_sd <- sd(elec_train)

We’ll attempt to forecast demand up to fourteen days ahead. How long, then, should be the input sequences? This is a matter of experimentation; all the more so now that we’re adding in the attention mechanism. (I suspect that it might not handle very long sequences so well).

Below, we go with fourteen days for input length, too, but that may not necessarily be the best possible choice for this series.

n_timesteps <- 7 * 2
n_forecast <- 7 * 2

elec_dataset <- dataset(
  name = "elec_dataset",
  
  initialize = function(x, n_timesteps, sample_frac = 1) {
    
    self$n_timesteps <- n_timesteps
    self$x <- torch_tensor((x - train_mean) / train_sd)
    
    n <- length(self$x) - self$n_timesteps - 1
    
    self$starts <- sort(sample.int(
      n = n,
      size = n * sample_frac
    ))
    
  },
  
  .getitem = function(i) {
    
    start <- self$starts[i]
    end <- start + self$n_timesteps - 1
    lag <- 1
    
    list(
      x = self$x[start:end],
      y = self$x[(start+lag):(end+lag)]$squeeze(2)
    )
    
  },
  
  .length = function() {
    length(self$starts) 
  }
)

batch_size <- 32

train_ds <- elec_dataset(elec_train, n_timesteps, sample_frac = 0.5)
train_dl <- train_ds %>% dataloader(batch_size = batch_size, shuffle = TRUE)

valid_ds <- elec_dataset(elec_valid, n_timesteps, sample_frac = 0.5)
valid_dl <- valid_ds %>% dataloader(batch_size = batch_size)

test_ds <- elec_dataset(elec_test, n_timesteps)
test_dl <- test_ds %>% dataloader(batch_size = 1)

Model

Model-wise, we again encounter the three modules familiar from the previous post: encoder, decoder, and top-level seq2seq module. However, there is an additional component: the attention module, used by the decoder to obtain attention weights.

Encoder

The encoder still works the same way. It wraps an RNN, and returns the final state.

encoder_module <- nn_module(
  
  initialize = function(type, input_size, hidden_size, num_layers = 1, dropout = 0) {
    
    self$type <- type
    
    self$rnn <- if (self$type == "gru") {
      nn_gru(
        input_size = input_size,
        hidden_size = hidden_size,
        num_layers = num_layers,
        dropout = dropout,
        batch_first = TRUE
      )
    } else {
      nn_lstm(
        input_size = input_size,
        hidden_size = hidden_size,
        num_layers = num_layers,
        dropout = dropout,
        batch_first = TRUE
      )
    }
    
  },
  
  forward = function(x) {
    
    x <- self$rnn(x)
    
    # return last states for all layers
    # per layer, a single tensor for GRU, a list of 2 tensors for LSTM
    x <- x[[2]]
    x
    
  }
)

Attention module

In basic seq2seq, whenever it had to generate a new value, the decoder took into account two things: its prior state, and the previous output generated. In an attention-enriched setup, the decoder additionally receives the complete output from the encoder. In deciding what subset of that output should matter, it gets help from a new agent, the attention module.

This, then, is the attention module’s raison d’être: Given current decoder state and well as complete encoder outputs, obtain a weighting of those outputs indicative of how relevant they are to what the decoder is currently up to. This procedure results in the so-called attention weights: a normalized score, for each time step in the encoding, that quantify their respective importance.

Attention may be implemented in a number of different ways. Here, we show two implementation options, one additive, and one multiplicative.

Additive attention

In additive attention, encoder outputs and decoder state are commonly either added or concatenated (we choose to do the latter, below). The resulting tensor is run through a linear layer, and a softmax is applied for normalization.

attention_module_additive <- nn_module(
  
  initialize = function(hidden_dim, attention_size) {
    
    self$attention <- nn_linear(2 * hidden_dim, attention_size)
    
  },
  
  forward = function(state, encoder_outputs) {
    
    # function argument shapes
    # encoder_outputs: (bs, timesteps, hidden_dim)
    # state: (1, bs, hidden_dim)
    
    # multiplex state to allow for concatenation (dimensions 1 and 2 must agree)
    seq_len <- dim(encoder_outputs)[2]
    # resulting shape: (bs, timesteps, hidden_dim)
    state_rep <- state$permute(c(2, 1, 3))$repeat_interleave(seq_len, 2)
    
    # concatenate along feature dimension
    concat <- torch_cat(list(state_rep, encoder_outputs), dim = 3)
    
    # run through linear layer with tanh
    # resulting shape: (bs, timesteps, attention_size)
    scores <- self$attention(concat) %>% 
      torch_tanh()
    
    # sum over attention dimension and normalize
    # resulting shape: (bs, timesteps) 
    attention_weights <- scores %>%
      torch_sum(dim = 3) %>%
      nnf_softmax(dim = 2)
    
    # a normalized score for every source token
    attention_weights
  }
)

Multiplicative attention

In multiplicative attention, scores are obtained by computing dot products between decoder state and all of the encoder outputs. Here too, a softmax is then used for normalization.

attention_module_multiplicative <- nn_module(
  
  initialize = function() {
    
    NULL
    
  },
  
  forward = function(state, encoder_outputs) {
    
    # function argument shapes
    # encoder_outputs: (bs, timesteps, hidden_dim)
    # state: (1, bs, hidden_dim)

    # allow for matrix multiplication with encoder_outputs
    state <- state$permute(c(2, 3, 1))
 
    # prepare for scaling by number of features
    d <- torch_tensor(dim(encoder_outputs)[3], dtype = torch_float())
       
    # scaled dot products between state and outputs
    # resulting shape: (bs, timesteps, 1)
    scores <- torch_bmm(encoder_outputs, state) %>%
      torch_div(torch_sqrt(d))
    
    # normalize
    # resulting shape: (bs, timesteps) 
    attention_weights <- scores$squeeze(3) %>%
      nnf_softmax(dim = 2)
    
    # a normalized score for every source token
    attention_weights
  }
)

Decoder

Once attention weights have been computed, their actual application is handled by the decoder. Concretely, the method in question, weighted_encoder_outputs(), computes a product of weights and encoder outputs, making sure that each output will have appropriate impact.

The rest of the action then happens in forward(). A concatenation of weighted encoder outputs (often called “context”) and current input is run through an RNN. Then, an ensemble of RNN output, context, and input is passed to an MLP. Finally, both RNN state and current prediction are returned.

decoder_module <- nn_module(
  
  initialize = function(type, input_size, hidden_size, attention_type, attention_size = 8, num_layers = 1) {
    
    self$type <- type
    
    self$rnn <- if (self$type == "gru") {
      nn_gru(
        input_size = input_size,
        hidden_size = hidden_size,
        num_layers = num_layers,
        batch_first = TRUE
      )
    } else {
      nn_lstm(
        input_size = input_size,
        hidden_size = hidden_size,
        num_layers = num_layers,
        batch_first = TRUE
      )
    }
    
    self$linear <- nn_linear(2 * hidden_size + 1, 1)
    
    self$attention <- if (attention_type == "multiplicative") attention_module_multiplicative()
      else attention_module_additive(hidden_size, attention_size)
    
  },
  
  weighted_encoder_outputs = function(state, encoder_outputs) {

    # encoder_outputs is (bs, timesteps, hidden_dim)
    # state is (1, bs, hidden_dim)
    # resulting shape: (bs * timesteps)
    attention_weights <- self$attention(state, encoder_outputs)
    
    # resulting shape: (bs, 1, seq_len)
    attention_weights <- attention_weights$unsqueeze(2)
    
    # resulting shape: (bs, 1, hidden_size)
    weighted_encoder_outputs <- torch_bmm(attention_weights, encoder_outputs)
    
    weighted_encoder_outputs
    
  },
  
  forward = function(x, state, encoder_outputs) {
 
    # encoder_outputs is (bs, timesteps, hidden_dim)
    # state is (1, bs, hidden_dim)
    
    # resulting shape: (bs, 1, hidden_size)
    context <- self$weighted_encoder_outputs(state, encoder_outputs)
    
    # concatenate input and context
    # NOTE: this repeating is done to compensate for the absence of an embedding module
    # that, in NLP, would give x a higher proportion in the concatenation
    x_rep <- x$repeat_interleave(dim(context)[3], 3) 
    rnn_input <- torch_cat(list(x_rep, context), dim = 3)
    
    # resulting shapes: (bs, 1, hidden_size) and (1, bs, hidden_size)
    rnn_out <- self$rnn(rnn_input, state)
    rnn_output <- rnn_out[[1]]
    next_hidden <- rnn_out[[2]]
    
    mlp_input <- torch_cat(list(rnn_output$squeeze(2), context$squeeze(2), x$squeeze(2)), dim = 2)
    
    output <- self$linear(mlp_input)
    
    # shapes: (bs, 1) and (1, bs, hidden_size)
    list(output, next_hidden)
  }
  
)

seq2seq module

The seq2seq module is basically unchanged (apart from the fact that now, it allows for attention module configuration). For a detailed explanation of what happens here, please consult the previous post.

seq2seq_module <- nn_module(
  
  initialize = function(type, input_size, hidden_size, attention_type, attention_size, n_forecast, 
                        num_layers = 1, encoder_dropout = 0) {
    
    self$encoder <- encoder_module(type = type, input_size = input_size, hidden_size = hidden_size,
                                   num_layers, encoder_dropout)
    self$decoder <- decoder_module(type = type, input_size = 2 * hidden_size, hidden_size = hidden_size,
                                   attention_type = attention_type, attention_size = attention_size, num_layers)
    self$n_forecast <- n_forecast
    
  },
  
  forward = function(x, y, teacher_forcing_ratio) {
    
    outputs <- torch_zeros(dim(x)[1], self$n_forecast)$to(device = device)
    encoded <- self$encoder(x)
    encoder_outputs <- encoded[[1]]
    hidden <- encoded[[2]]
    # list of (batch_size, 1), (1, batch_size, hidden_size)
    out <- self$decoder(x[ , n_timesteps, , drop = FALSE], hidden, encoder_outputs)
    # (batch_size, 1)
    pred <- out[[1]]
    # (1, batch_size, hidden_size)
    state <- out[[2]]
    outputs[ , 1] <- pred$squeeze(2)
    
    for (t in 2:self$n_forecast) {
      
      teacher_forcing <- runif(1) < teacher_forcing_ratio
      input <- if (teacher_forcing == TRUE) pred$unsqueeze(3) else y[ , t - 1]
      out <- self$decoder(pred$unsqueeze(3), state, encoder_outputs)
      pred <- out[[1]]
      state <- out[[2]]
      outputs[ , t] <- pred$squeeze(2)
      
    }
    
    outputs
  }
  
)

When instantiating the top-level model, we now have an additional choice: that between additive and multiplicative attention. In the “accuracy” sense of performance, my tests did not show any differences. However, the multiplicative variant is a lot faster.

net <- seq2seq_module("gru", input_size = 1, hidden_size = 32, attention_type = "multiplicative",
                      attention_size = 8, n_forecast = n_timesteps)

# training RNNs on the GPU currently prints a warning that may clutter 
# the console
# see https://github.com/mlverse/torch/issues/461
# alternatively, use 
# device <- "cpu"
device <- torch_device(if (cuda_is_available()) "cuda" else "cpu")

net <- net$to(device = device)

Training

Just like last time, in model training, we get to choose the degree of teacher forcing. Below, we go with a fraction of 0.0, that is, no forcing at all.

optimizer <- optim_adam(net$parameters, lr = 0.001)

num_epochs <- 100

train_batch <- function(b, teacher_forcing_ratio) {
  
  optimizer$zero_grad()
  output <- net(b$x$to(device = device), b$y$to(device = device), teacher_forcing_ratio)
  target <- b$y$to(device = device)
  
  loss <- nnf_mse_loss(output, target)
  loss$backward()
  optimizer$step()
  
  loss$item()
  
}

valid_batch <- function(b, teacher_forcing_ratio = 0) {
  
  output <- net(b$x$to(device = device), b$y$to(device = device), teacher_forcing_ratio)
  target <- b$y$to(device = device)
  
  loss <- nnf_mse_loss(output, target)
  
  loss$item()
  
}

for (epoch in 1:num_epochs) {
  
  net$train()
  train_loss <- c()
  
  coro::loop(for (b in train_dl) {
    loss <-train_batch(b, teacher_forcing_ratio = 0.3)
    train_loss <- c(train_loss, loss)
  })
  
  cat(sprintf("nEpoch %d, training: loss: %3.5f n", epoch, mean(train_loss)))
  
  net$eval()
  valid_loss <- c()
  
  coro::loop(for (b in valid_dl) {
    loss <- valid_batch(b)
    valid_loss <- c(valid_loss, loss)
  })
  
  cat(sprintf("nEpoch %d, validation: loss: %3.5f n", epoch, mean(valid_loss)))
}
# Epoch 1, training: loss: 0.83752 
# Epoch 1, validation: loss: 0.83167

# Epoch 2, training: loss: 0.72803 
# Epoch 2, validation: loss: 0.80804 

# ...
# ...

# Epoch 99, training: loss: 0.10385 
# Epoch 99, validation: loss: 0.21259 

# Epoch 100, training: loss: 0.10396 
# Epoch 100, validation: loss: 0.20975 

Evaluation

For visual inspection, we pick a few forecasts from the test set.

net$eval()

test_preds <- vector(mode = "list", length = length(test_dl))

i <- 1

vic_elec_test <- vic_elec_daily %>%
  filter(year(Date) == 2014, month(Date) %in% 1:4)


coro::loop(for (b in test_dl) {
  
  input <- b$x
  output <- net(b$x$to(device = device), b$y$to(device = device), teacher_forcing_ratio = 0)
  preds <- as.numeric(output)
  
  test_preds[[i]] <- preds
  i <<- i + 1
  
})

test_pred1 <- test_preds[[1]]
test_pred1 <- c(rep(NA, n_timesteps), test_pred1, rep(NA, nrow(vic_elec_test) - n_timesteps - n_forecast))

test_pred2 <- test_preds[[21]]
test_pred2 <- c(rep(NA, n_timesteps + 20), test_pred2, rep(NA, nrow(vic_elec_test) - 20 - n_timesteps - n_forecast))

test_pred3 <- test_preds[[41]]
test_pred3 <- c(rep(NA, n_timesteps + 40), test_pred3, rep(NA, nrow(vic_elec_test) - 40 - n_timesteps - n_forecast))

test_pred4 <- test_preds[[61]]
test_pred4 <- c(rep(NA, n_timesteps + 60), test_pred4, rep(NA, nrow(vic_elec_test) - 60 - n_timesteps - n_forecast))

test_pred5 <- test_preds[[81]]
test_pred5 <- c(rep(NA, n_timesteps + 80), test_pred5, rep(NA, nrow(vic_elec_test) - 80 - n_timesteps - n_forecast))


preds_ts <- vic_elec_test %>%
  select(Demand, Date) %>%
  add_column(
    ex_1 = test_pred1 * train_sd + train_mean,
    ex_2 = test_pred2 * train_sd + train_mean,
    ex_3 = test_pred3 * train_sd + train_mean,
    ex_4 = test_pred4 * train_sd + train_mean,
    ex_5 = test_pred5 * train_sd + train_mean) %>%
  pivot_longer(-Date) %>%
  update_tsibble(key = name)


preds_ts %>%
  autoplot() +
  scale_color_hue(h = c(80, 300), l = 70) +
  theme_minimal()
A sample of two-weeks-ahead predictions for the test set, 2014.

(#fig:unnamed-chunk-11)A sample of two-weeks-ahead predictions for the test set, 2014.

We can’t directly compare performance here to that of previous models in our series, as we’ve pragmatically redefined the task. The main goal, however, has been to introduce the concept of attention. Specifically, how to manually implement the technique – something that, once you’ve understood the concept, you may never have to do in practice. Instead, you would likely make use of existing tools that come with torch (multi-head attention and transformer modules), tools we may introduce in a future “season” of this series.

Thanks for reading!

Photo by David Clode on Unsplash

Bahdanau, Dzmitry, Kyunghyun Cho, and Yoshua Bengio. 2014. “Neural Machine Translation by Jointly Learning to Align and Translate.” CoRR abs/1409.0473. http://arxiv.org/abs/1409.0473.

Dong, Yihe, Jean-Baptiste Cordonnier, and Andreas Loukas. 2021. “Attention is Not All You Need: Pure Attention Loses Rank Doubly Exponentially with Depth.” arXiv E-Prints, March, arXiv:2103.03404. http://arxiv.org/abs/2103.03404.

Vaswani, Ashish, Noam Shazeer, Niki Parmar, Jakob Uszkoreit, Llion Jones, Aidan N. Gomez, Lukasz Kaiser, and Illia Polosukhin. 2017. “Attention Is All You Need.” arXiv E-Prints, June, arXiv:1706.03762. http://arxiv.org/abs/1706.03762.

Vinyals, Oriol, Lukasz Kaiser, Terry Koo, Slav Petrov, Ilya Sutskever, and Geoffrey E. Hinton. 2014. “Grammar as a Foreign Language.” CoRR abs/1412.7449. http://arxiv.org/abs/1412.7449.

Xu, Kelvin, Jimmy Ba, Ryan Kiros, Kyunghyun Cho, Aaron C. Courville, Ruslan Salakhutdinov, Richard S. Zemel, and Yoshua Bengio. 2015. “Show, Attend and Tell: Neural Image Caption Generation with Visual Attention.” CoRR abs/1502.03044. http://arxiv.org/abs/1502.03044.

  1. For important papers see: Bahdanau, Cho, and Bengio (2014), Vinyals et al. (2014), Xu et al. (2015).↩︎

  2. Dong, Cordonnier, and Loukas (2021), thus replying to Vaswani et al. (2017), whose 2017 paper “went viral” for stating the opposite.↩︎

Categories
Offsites

Massively Parallel Graph Computation: From Theory to Practice

Graphs are useful theoretical representations of the connections between groups of entities, and have been used for a variety of purposes in data science, from ranking web pages by popularity and mapping out social networks, to assisting with navigation. In many cases, such applications require the processing of graphs containing hundreds of billions of edges, which is far too large to be processed on a single consumer-grade machine. A typical approach to scaling graph algorithms is to run in a distributed setting, i.e., to partition the data (and the algorithm) among multiple computers to perform the computation in parallel. While this approach allows one to process graphs with trillions of edges, it also introduces new challenges. Namely, because each computer only sees a small piece of the input graph at a time, one needs to handle inter-machine communication and design algorithms that can be split across multiple computers.

A framework for implementing distributed algorithms, MapReduce, was introduced in 2008. It transparently handled communication between machines while offering good fault-tolerance capabilities and inspired the development of a number of distributed computation frameworks, including Pregel, Apache Hadoop, and many others. Still, the challenge of developing algorithms for distributed computation on very large graphs remained, and designing efficient algorithms in this context even for basic problems, such as connected components, maximum matching or shortest paths, has been an active area of research. While recent work has demonstrated new algorithms for many problems, including our algorithms for connected components (both in theory and practice) and hierarchical clustering, there was still a need for methods that could solve a range of problems more quickly.

Today we present a pair of recent papers that address this problem by first constructing a theoretical model for distributed graph algorithms and then demonstrating how the model can be applied. The proposed model, Adaptive Massively Parallel Computation (AMPC), augments the theoretical capabilities of MapReduce, providing a pathway to solve many graph problems in fewer computation rounds. We also show how the AMPC model can be effectively implemented in practice. The suite of algorithms we describe, which includes algorithms for maximal independent set, maximum matching, connected components and minimum spanning tree, work up to 7x faster than current state-of-the-art approaches.

Limitations of MapReduce
In order to understand the limitations of MapReduce for developing graph algorithms, consider a simplified variant of the connected components problem. The input is a collection of rooted trees, and the goal is to compute, for each node, the root of its tree. Even this seemingly simple problem is not easy to solve in MapReduce. In fact, in the Massively Parallel Computation (MPC) model — the theoretical model behind MapReduce, Pregel, Apache Giraph and many other distributed computation frameworks — this problem is widely believed to require at least a number of rounds of computation proportional to log n, where n is the total number of nodes in the graph. While log n may not seem to be a large number, algorithms processing trillion-edge graphs often write hundreds of terabytes of data to disk in each round, and thus even a small reduction in the number of rounds may bring significant resource savings.

The problem of finding root nodes. Nodes are represented by blue circles. Gray arrows point from each node to its parent. The root nodes are the nodes with no parents. The orange arrows illustrate the path an algorithm would follow from a node to the root of the tree to which it belongs.

A similar subproblem showed up in our algorithms for finding connected components and computing a hierarchical clustering. We observed that one can bypass the limitations of MapReduce by implementing these algorithms through the use of a distributed hash table (DHT), a service that is initialized with a collection of key-value pairs and then returns a value associated with a provided key in real-time. In our implementation, for each node, the DHT stores its parent node. Then, a machine that processes a graph node can use the DHT and “walk up” the tree until it reaches the root. While the use of a DHT worked well for this particular problem (although it relied on the input trees being not too deep), it was unclear if the idea could be applied more broadly.

The Adaptive Massively Parallel Computation Model
To extend this approach to other problems, we started by developing a model to theoretically analyze algorithms that utilize a DHT. The resulting AMPC model builds upon the well-established MPC model and formally describes the capabilities brought by the use of a distributed hash table.

In the MPC model there is a collection of machines, which communicate via message passing in synchronous rounds. Messages sent in one round are delivered in the beginning of the following round and constitute that round’s entire input (i.e., the machines do not retain information from one round to the next). In the first round, one can assume that the input is randomly distributed across the machines. The goal is to minimize the number of computation rounds, while assuring load-balancing between machines in each round.

Computation in the MPC model. Each column represents one machine in subsequent computation rounds. Once all machines have completed a round of computation, all messages sent in that round are delivered, and the following round begins.

We then formalized the AMPC model by introducing a new approach, in which machines write to a write-only distributed hash table each round, instead of communicating via messages. Once a new round starts, the hash table from the previous round becomes read-only and a new write-only output hash table becomes available. What is important is that only the method of communication changes — the amount of communication and available space per machine is constrained exactly in the same way as in the MPC model. Hence, at a high level the added capability of the AMPC model is that each machine can choose what data to read, instead of being provided a piece of data.

Computation in the AMPC model. Once all machines have completed a round of computation, the data they produced is saved to a distributed hash table. In the following round, each machine can read arbitrary values from this distributed hash table and write to a new distributed hash table.

Algorithms and Empirical Evaluation
This seemingly small difference in the way machines communicate allowed us to design much faster algorithms to a number of basic graph problems. In particular, we show that it is possible to find connected components, minimum spanning tree, maximal matching and maximal independent set in a constant number of rounds, regardless of the size of the graph.

To investigate the practical applicability of the AMPC algorithms, we have instantiated the model by combining Flume C++ (a C++ counterpart of FlumeJava) with a DHT communication layer. We have evaluated our AMPC algorithms for minimum spanning tree, maximal independent set and maximum matching and observed that we can achieve up to 7x speedups over implementations that did not use a DHT. At the same time, the AMPC implementations used 10x fewer rounds on average to complete, and also wrote less data to disk.

Our implementation of the AMPC model took advantage of hardware-accelerated remote direct memory access (RDMA), a technology that allows reading from the memory of a remote machine with a latency of a few microseconds, which is just an order of magnitude slower than reading from local memory. While some of the AMPC algorithms communicated more data than their MPC counterparts, they were overall faster, as they performed mostly fast reads using RDMA, instead of costly writes to disk.

Conclusion
With the AMPC model, we built a theoretical framework inspired by practically efficient implementations, and then developed new theoretical algorithms that delivered good empirical performance and maintained good fault-tolerance properties. We’ve been happy to see that the AMPC model has already been the subject of further study and are excited to learn what other problems can be solved more efficiently using the AMPC model or its practical implementations.

Acknowledgements
Co-authors on the two papers covered in this blog post include Soheil Behnezhad, Laxman Dhulipala, Hossein Esfandiari, and Warren Schudy. We also thank members of the Graph Mining team for their collaborations, and especially Mohammad Hossein Bateni for his input on this post. To learn more about our recent work on scalable graph algorithms, see videos from our recent Graph Mining and Learning workshop.

Categories
Offsites

torch time series, take three: Sequence-to-sequence prediction

Today, we continue our exploration of multi-step time-series forecasting with torch. This post is the third in a series.

  • Initially, we covered basics of recurrent neural networks (RNNs), and trained a model to predict the very next value in a sequence. We also found we could forecast quite a few steps ahead by feeding back individual predictions in a loop.

  • Next, we built a model “natively” for multi-step prediction. A small multi-layer-perceptron (MLP) was used to project RNN output to several time points in the future.

Of both approaches, the latter was the more successful. But conceptually, it has an unsatisfying touch to it: When the MLP extrapolates and generates output for, say, ten consecutive points in time, there is no causal relation between those. (Imagine a weather forecast for ten days that never got updated.)

Now, we’d like to try something more intuitively appealing. The input is a sequence; the output is a sequence. In natural language processing (NLP), this type of task is very common: It’s exactly the kind of situation we see with machine translation or summarization.

Quite fittingly, the types of models employed to these ends are named sequence-to-sequence models (often abbreviated seq2seq). In a nutshell, they split up the task into two components: an encoding and a decoding part. The former is done just once per input-target pair. The latter is done in a loop, as in our first try. But the decoder has more information at its disposal: At each iteration, its processing is based on the previous prediction as well as previous state. That previous state will be the encoder’s when a loop is started, and its own ever thereafter.

Before discussing the model in detail, we need to adapt our data input mechanism.

Data input

We continue working with vic_elec , provided by tsibbledata.

Again, the dataset definition in the current post looks a bit different from the way it did before; it’s the shape of the target that differs. This time, y equals x, shifted to the left by one.

The reason we do this is owed to the way we are going to train the network. With seq2seq, people often use a technique called “teacher forcing” where, instead of feeding back its own prediction into the decoder module, you pass it the value it should have predicted. To be clear, this is done during training only, and to a configurable degree.

n_timesteps <- 7 * 24 * 2
n_forecast <- n_timesteps

vic_elec_get_year <- function(year, month = NULL) {
  vic_elec %>%
    filter(year(Date) == year, month(Date) == if (is.null(month)) month(Date) else month) %>%
    as_tibble() %>%
    select(Demand)
}

elec_train <- vic_elec_get_year(2012) %>% as.matrix()
elec_valid <- vic_elec_get_year(2013) %>% as.matrix()
elec_test <- vic_elec_get_year(2014, 1) %>% as.matrix()

train_mean <- mean(elec_train)
train_sd <- sd(elec_train)

elec_dataset <- dataset(
  name = "elec_dataset",
  
  initialize = function(x, n_timesteps, sample_frac = 1) {
    
    self$n_timesteps <- n_timesteps
    self$x <- torch_tensor((x - train_mean) / train_sd)
    
    n <- length(self$x) - self$n_timesteps - 1
    
    self$starts <- sort(sample.int(
      n = n,
      size = n * sample_frac
    ))
    
  },
  
  .getitem = function(i) {
    
    start <- self$starts[i]
    end <- start + self$n_timesteps - 1
    lag <- 1
    
    list(
      x = self$x[start:end],
      y = self$x[(start+lag):(end+lag)]$squeeze(2)
    )
    
  },
  
  .length = function() {
    length(self$starts) 
  }
)

Dataset as well as dataloader instantations then can proceed as before.

batch_size <- 32

train_ds <- elec_dataset(elec_train, n_timesteps, sample_frac = 0.5)
train_dl <- train_ds %>% dataloader(batch_size = batch_size, shuffle = TRUE)

valid_ds <- elec_dataset(elec_valid, n_timesteps, sample_frac = 0.5)
valid_dl <- valid_ds %>% dataloader(batch_size = batch_size)

test_ds <- elec_dataset(elec_test, n_timesteps)
test_dl <- test_ds %>% dataloader(batch_size = 1)

Model

Technically, the model consists of three modules: the aforementioned encoder and decoder, and the seq2seq module that orchestrates them.

Encoder

The encoder takes its input and runs it through an RNN. Of the two things returned by a recurrent neural network, outputs and state, so far we’ve only been using output. This time, we do the opposite: We throw away the outputs, and only return the state.

If the RNN in question is a GRU (and assuming that of the outputs, we take just the final time step, which is what we’ve been doing throughout), there really is no difference: The final state equals the final output. If it’s an LSTM, however, there is a second kind of state, the “cell state”. In that case, returning the state instead of the final output will carry more information.

encoder_module <- nn_module(
  
  initialize = function(type, input_size, hidden_size, num_layers = 1, dropout = 0) {
    
    self$type <- type
    
    self$rnn <- if (self$type == "gru") {
      nn_gru(
        input_size = input_size,
        hidden_size = hidden_size,
        num_layers = num_layers,
        dropout = dropout,
        batch_first = TRUE
      )
    } else {
      nn_lstm(
        input_size = input_size,
        hidden_size = hidden_size,
        num_layers = num_layers,
        dropout = dropout,
        batch_first = TRUE
      )
    }
    
  },
  
  forward = function(x) {
    
    x <- self$rnn(x)
    
    # return last states for all layers
    # per layer, a single tensor for GRU, a list of 2 tensors for LSTM
    x <- x[[2]]
    x
    
  }
  
)

Decoder

In the decoder, just like in the encoder, the main component is an RNN. In contrast to previously-shown architectures, though, it does not just return a prediction. It also reports back the RNN’s final state.

decoder_module <- nn_module(
  
  initialize = function(type, input_size, hidden_size, num_layers = 1) {
    
    self$type <- type
    
    self$rnn <- if (self$type == "gru") {
      nn_gru(
        input_size = input_size,
        hidden_size = hidden_size,
        num_layers = num_layers,
        batch_first = TRUE
      )
    } else {
      nn_lstm(
        input_size = input_size,
        hidden_size = hidden_size,
        num_layers = num_layers,
        batch_first = TRUE
      )
    }
    
    self$linear <- nn_linear(hidden_size, 1)
    
  },
  
  forward = function(x, state) {
    
    # input to forward:
    # x is (batch_size, 1, 1)
    # state is (1, batch_size, hidden_size)
    x <- self$rnn(x, state)
    
    # break up RNN return values
    # output is (batch_size, 1, hidden_size)
    # next_hidden is
    c(output, next_hidden) %<-% x
    
    output <- output$squeeze(2)
    output <- self$linear(output)
    
    list(output, next_hidden)
    
  }
  
)

seq2seq module

seq2seq is where the action happens. The plan is to encode once, then call the decoder in a loop.

If you look back to decoder forward(), you see that it takes two arguments: x and state.

Depending on the context, x corresponds to one of three things: final input, preceding prediction, or prior ground truth.

  • The very first time the decoder is called on an input sequence, x maps to the final input value. This is different from a task like machine translation, where you would pass in a start token. With time series, though, we’d like to continue where the actual measurements stop.

  • In further calls, we want the decoder to continue from its most recent prediction. It is only logical, thus, to pass back the preceding forecast.

  • That said, in NLP a technique called “teacher forcing” is commonly used to speed up training. With teacher forcing, instead of the forecast we pass the actual ground truth, the thing the decoder should have predicted. We do that only in a configurable fraction of cases, and – naturally – only while training. The rationale behind this technique is that without this form of re-calibration, consecutive prediction errors can quickly erase any remaining signal.

state, too, is polyvalent. But here, there are just two possibilities: encoder state and decoder state.

  • The first time the decoder is called, it is “seeded” with the final state from the encoder. Note how this is the only time we make use of the encoding.

  • From then on, the decoder’s own previous state will be passed. Remember how it returns two values, forecast and state?

seq2seq_module <- nn_module(
  
  initialize = function(type, input_size, hidden_size, n_forecast, num_layers = 1, encoder_dropout = 0) {
    
    self$encoder <- encoder_module(type = type, input_size = input_size,
                                   hidden_size = hidden_size, num_layers, encoder_dropout)
    self$decoder <- decoder_module(type = type, input_size = input_size,
                                   hidden_size = hidden_size, num_layers)
    self$n_forecast <- n_forecast
    
  },
  
  forward = function(x, y, teacher_forcing_ratio) {
    
    # prepare empty output
    outputs <- torch_zeros(dim(x)[1], self$n_forecast)$to(device = device)
    
    # encode current input sequence
    hidden <- self$encoder(x)
    
    # prime decoder with final input value and hidden state from the encoder
    out <- self$decoder(x[ , n_timesteps, , drop = FALSE], hidden)
    
    # decompose into predictions and decoder state
    # pred is (batch_size, 1)
    # state is (1, batch_size, hidden_size)
    c(pred, state) %<-% out
    
    # store first prediction
    outputs[ , 1] <- pred$squeeze(2)
    
    # iterate to generate remaining forecasts
    for (t in 2:self$n_forecast) {
      
      # call decoder on either ground truth or previous prediction, plus previous decoder state
      teacher_forcing <- runif(1) < teacher_forcing_ratio
      input <- if (teacher_forcing == TRUE) y[ , t - 1, drop = FALSE] else pred
      input <- input$unsqueeze(3)
      out <- self$decoder(input, state)
      
      # again, decompose decoder return values
      c(pred, state) %<-% out
      # and store current prediction
      outputs[ , t] <- pred$squeeze(2)
    }
    outputs
  }
  
)

net <- seq2seq_module("gru", input_size = 1, hidden_size = 32, n_forecast = n_forecast)

# training RNNs on the GPU currently prints a warning that may clutter 
# the console
# see https://github.com/mlverse/torch/issues/461
# alternatively, use 
# device <- "cpu"
device <- torch_device(if (cuda_is_available()) "cuda" else "cpu")

net <- net$to(device = device)

Training

The training procedure is mainly unchanged. We do, however, need to decide about teacher_forcing_ratio, the proportion of input sequences we want to perform re-calibration on. In valid_batch(), this should always be 0, while in train_batch(), it’s up to us (or rather, experimentation). Here, we set it to 0.3.

optimizer <- optim_adam(net$parameters, lr = 0.001)

num_epochs <- 50

train_batch <- function(b, teacher_forcing_ratio) {
  
  optimizer$zero_grad()
  output <- net(b$x$to(device = device), b$y$to(device = device), teacher_forcing_ratio)
  target <- b$y$to(device = device)
  
  loss <- nnf_mse_loss(output, target)
  loss$backward()
  optimizer$step()
  
  loss$item()
  
}

valid_batch <- function(b, teacher_forcing_ratio = 0) {
  
  output <- net(b$x$to(device = device), b$y$to(device = device), teacher_forcing_ratio)
  target <- b$y$to(device = device)
  
  loss <- nnf_mse_loss(output, target)
  
  loss$item()
  
}

for (epoch in 1:num_epochs) {
  
  net$train()
  train_loss <- c()
  
  coro::loop(for (b in train_dl) {
    loss <-train_batch(b, teacher_forcing_ratio = 0.3)
    train_loss <- c(train_loss, loss)
  })
  
  cat(sprintf("nEpoch %d, training: loss: %3.5f n", epoch, mean(train_loss)))
  
  net$eval()
  valid_loss <- c()
  
  coro::loop(for (b in valid_dl) {
    loss <- valid_batch(b)
    valid_loss <- c(valid_loss, loss)
  })
  
  cat(sprintf("nEpoch %d, validation: loss: %3.5f n", epoch, mean(valid_loss)))
}
Epoch 1, training: loss: 0.37961 

Epoch 1, validation: loss: 1.10699 

Epoch 2, training: loss: 0.19355 

Epoch 2, validation: loss: 1.26462 

# ...
# ...

Epoch 49, training: loss: 0.03233 

Epoch 49, validation: loss: 0.62286 

Epoch 50, training: loss: 0.03091 

Epoch 50, validation: loss: 0.54457

It’s interesting to compare performances for different settings of teacher_forcing_ratio. With a setting of 0.5, training loss decreases a lot more slowly; the opposite is seen with a setting of 0. Validation loss, however, is not affected significantly.

Evaluation

The code to inspect test-set forecasts is unchanged.

net$eval()

test_preds <- vector(mode = "list", length = length(test_dl))

i <- 1

coro::loop(for (b in test_dl) {
  
  input <- b$x
  output <- net(input$to(device = device))
  preds <- as.numeric(output)
  
  test_preds[[i]] <- preds
  i <<- i + 1
  
})

vic_elec_jan_2014 <- vic_elec %>%
  filter(year(Date) == 2014, month(Date) == 1)

test_pred1 <- test_preds[[1]]
test_pred1 <- c(rep(NA, n_timesteps), test_pred1, rep(NA, nrow(vic_elec_jan_2014) - n_timesteps - n_forecast))

test_pred2 <- test_preds[[408]]
test_pred2 <- c(rep(NA, n_timesteps + 407), test_pred2, rep(NA, nrow(vic_elec_jan_2014) - 407 - n_timesteps - n_forecast))

test_pred3 <- test_preds[[817]]
test_pred3 <- c(rep(NA, nrow(vic_elec_jan_2014) - n_forecast), test_pred3)


preds_ts <- vic_elec_jan_2014 %>%
  select(Demand) %>%
  add_column(
    mlp_ex_1 = test_pred1 * train_sd + train_mean,
    mlp_ex_2 = test_pred2 * train_sd + train_mean,
    mlp_ex_3 = test_pred3 * train_sd + train_mean) %>%
  pivot_longer(-Time) %>%
  update_tsibble(key = name)


preds_ts %>%
  autoplot() +
  scale_colour_manual(values = c("#08c5d1", "#00353f", "#ffbf66", "#d46f4d")) +
  theme_minimal()
One-week-ahead predictions for January, 2014.

(#fig:unnamed-chunk-8)One-week-ahead predictions for January, 2014.

Comparing this to the forecast obtained from last time’s RNN-MLP combo, we don’t see much of a difference. Is this surprising? To me it is. If asked to speculate about the reason, I would probably say this: In all of the architectures we’ve used so far, the main carrier of information has been the final hidden state of the RNN (one and only RNN in the two previous setups, encoder RNN in this one). It will be interesting to see what happens in the last part of this series, when we augment the encoder-decoder architecture by attention.

Thanks for reading!

Photo by Suzuha Kozuki on Unsplash

Categories
Offsites

Contactless Sleep Sensing in Nest Hub

People often turn to technology to manage their health and wellbeing, whether it is to record their daily exercise, measure their heart rate, or increasingly, to understand their sleep patterns. Sleep is foundational to a person’s everyday wellbeing and can be impacted by (and in turn, have an impact on) other aspects of one’s life — mood, energy, diet, productivity, and more.

As part of our ongoing efforts to support people’s health and happiness, today we announced Sleep Sensing in the new Nest Hub, which uses radar-based sleep tracking in addition to an algorithm for cough and snore detection. While not intended for medical purposes1, Sleep Sensing is an opt-in feature that can help users better understand their nighttime wellness using a contactless bedside setup. Here we describe the technologies behind Sleep Sensing and discuss how we leverage on-device signal processing to enable sleep monitoring (comparable to other clinical- and consumer-grade devices) in a way that protects user privacy.

Soli for Sleep Tracking
Sleep Sensing in Nest Hub demonstrates the first wellness application of Soli, a miniature radar sensor that can be used for gesture sensing at various scales, from a finger tap to movements of a person’s body. In Pixel 4, Soli powers Motion Sense, enabling touchless interactions with the phone to skip songs, snooze alarms, and silence phone calls. We extended this technology and developed an embedded Soli-based algorithm that could be implemented in Nest Hub for sleep tracking.

Soli consists of a millimeter-wave frequency-modulated continuous wave (FMCW) radar transceiver that emits an ultra-low power radio wave and measures the reflected signal from the scene of interest. The frequency spectrum of the reflected signal contains an aggregate representation of the distance and velocity of objects within the scene. This signal can be processed to isolate a specified range of interest, such as a user’s sleeping area, and to detect and characterize a wide range of motions within this region, ranging from large body movements to sub-centimeter respiration.

Soli spectrogram illustrating its ability to detect a wide range of motions, characterized as (a) an empty room (no variation in the reflected signal demonstrated by the black space), (b) large pose changes, (c) brief limb movements, and (d) sub-centimeter chest and torso displacements from respiration while at rest.

In order to make use of this signal for Sleep Sensing, it was necessary to design an algorithm that could determine whether a person is present in the specified sleeping area and, if so, whether the person is asleep or awake. We designed a custom machine-learning (ML) model to efficiently process a continuous stream of 3D radar tensors (summarizing activity over a range of distances, frequencies, and time) and automatically classify each feature into one of three possible states: absent, awake, and asleep.

To train and evaluate the model, we recorded more than a million hours of radar data from thousands of individuals, along with thousands of sleep diaries, reference sensor recordings, and external annotations. We then leveraged the TensorFlow Extended framework to construct a training pipeline to process this data and produce an efficient TensorFlow Lite embedded model. In addition, we created an automatic calibration algorithm that runs during setup to configure the part of the scene on which the classifier will focus. This ensures that the algorithm ignores motion from a person on the other side of the bed or from other areas of the room, such as ceiling fans and swaying curtains.

The custom ML model efficiently processes a continuous stream of 3D radar tensors (summarizing activity over a range of distances, frequencies, and time) to automatically compute probabilities for the likelihood of user presence and wakefulness (awake or asleep).

To validate the accuracy of the algorithm, we compared it to the gold-standard of sleep-wake determination, the polysomnogram sleep study, in a cohort of 33 “healthy sleepers” (those without significant sleep issues, like sleep apnea or insomnia) across a broad age range (19-78 years of age). Sleep studies are typically conducted in clinical and research laboratories in order to collect various body signals (brain waves, muscle activity, respiratory and heart rate measurements, body movement and position, and snoring), which can then be interpreted by trained sleep experts to determine stages of sleep and identify relevant events. To account for variability in how different scorers apply the American Academy of Sleep Medicine’s staging and scoring rules, our study used two board-certified sleep technologists to independently annotate each night of sleep and establish a definitive groundtruth.

We compared our Sleep Sensing algorithm’s outputs to the corresponding groundtruth sleep and wake labels for every 30-second epoch of time to compute standard performance metrics (e.g., sensitivity and specificity). While not a true head-to-head comparison, this study’s results can be compared against previously published studies in similar cohorts with comparable methodologies in order to get a rough estimate of performance. In “Sleep-wake detection with a contactless, bedside radar sleep sensing system”, we share the full details of these validation results, demonstrating sleep-wake estimation equivalent to or, in some cases, better than current clinical and consumer sleep tracking devices.

Aggregate performance from previously published accuracies for detection of sleep (sensitivity) and wake (specificity) of a variety of sleep trackers against polysomnography in a variety of different studies, accounting for 3,990 nights in total. While this is not a head-to-head comparison, the performance of Sleep Sensing on Nest Hub in a population of healthy sleepers who simultaneously underwent polysomnography is added to the figure for rough comparison. The size of each circle is a reflection of the number of nights and the inset illustrates the mean±standard deviation for the performance metrics.

Understanding Sleep Quality with Audio Sensing
The Soli-based sleep tracking algorithm described above gives users a convenient and reliable way to see how much sleep they are getting and when sleep disruptions occur. However, to understand and improve their sleep, users also need to understand why their sleep is disrupted. To assist with this, Nest Hub uses its array of sensors to track common sleep disturbances, such as light level changes or uncomfortable room temperature. In addition to these, respiratory events like coughing and snoring are also frequent sources of disturbance, but people are often unaware of these events.

As with other audio-processing applications like speech or music recognition, coughing and snoring exhibit distinctive temporal patterns in the audio frequency spectrum, and with sufficient data an ML model can be trained to reliably recognize these patterns while simultaneously ignoring a wide variety of background noises, from a humming fan to passing cars. The model uses entirely on-device audio processing with privacy-preserving analysis, with no raw audio data sent to Google’s servers. A user can then opt to save the outputs of the processing (sound occurrences, such as the number of coughs and snore minutes) in Google Fit, in order to view personal insights and summaries of their night time wellness over time.

The Nest Hub displays when snoring and coughing may have disturbed a user’s sleep (top) and can track weekly trends (bottom).

To train the model, we assembled a large, hand-labeled dataset, drawing examples from the publicly available AudioSet research dataset as well as hundreds of thousands of additional real-world audio clips contributed by thousands of individuals.

Log-Mel spectrogram inputs comparing cough (left) and snore (right) audio snippets.

When a user opts in to cough and snore tracking on their bedside Nest Hub, the device first uses its Soli-based sleep algorithms to detect when a user goes to bed. Once it detects that a user has fallen asleep, it then activates its on-device sound sensing model and begins processing audio. The model works by continuously extracting spectrogram-like features from the audio input and feeding them through a convolutional neural network classifier in order to estimate the probability that coughing or snoring is happening at a given instant in time. These estimates are analyzed over the course of the night to produce a report of the overall cough count and snoring duration and highlight exactly when these events occurred.

Conclusion
The new Nest Hub, with its underlying Sleep Sensing features, is a first step in empowering users to understand their nighttime wellness using privacy-preserving radar and audio signals. We continue to research additional ways that ambient sensing and the predictive ability of consumer devices could help people better understand their daily health and wellness in a privacy-preserving way.

Acknowledgements
This work involved collaborative efforts from a multidisciplinary team of software engineers, researchers, clinicians, and cross-functional contributors. Special thanks to D. Shin for his significant contributions to this technology and blogpost, and Dr. Logan Schneider, visiting sleep neurologist affiliated with the Stanford/VA Alzheimer’s Center and Stanford Sleep Center, whose clinical expertise and contributions were invaluable to continuously guide this research. In addition to the authors, key contributors to this research from Google Health include Jeffrey Yu, Allen Jiang, Arno Charton, Jake Garrison, Navreet Gill, Sinan Hersek, Yijie Hong, Jonathan Hsu, Andi Janti, Ajay Kannan, Mukil Kesavan, Linda Lei, Kunal Okhandiar‎, Xiaojun Ping, Jo Schaeffer, Neil Smith, Siddhant Swaroop, Bhavana Koka, Anupam Pathak, Dr. Jim Taylor, and the extended team. Another special thanks to Ken Mixter for his support and contributions to the development and integration of this technology into Nest Hub. Thanks to Mark Malhotra and Shwetak Patel for their ongoing leadership, as well as the Nest, Fit, Soli, and Assistant teams we collaborated with to build and validate Sleep Sensing on Nest Hub.


1 Not intended to diagnose, cure, mitigate, prevent or treat any disease or condition. 

Categories
Offsites

LEAF: A Learnable Frontend for Audio Classification

Developing machine learning (ML) models for audio understanding has seen tremendous progress over the past several years. Leveraging the ability to learn parameters from data, the field has progressively shifted from composite, handcrafted systems to today’s deep neural classifiers that are used to recognize speech, understand music, or classify animal vocalizations such as bird calls. However, unlike computer vision models, which can learn from raw pixels, deep neural networks for audio classification are rarely trained from raw audio waveforms. Instead, they rely on pre-processed data in the form of mel filterbanks — handcrafted mel-scaled spectrograms that have been designed to replicate some aspects of the human auditory response.

Although modeling mel filterbanks for ML tasks has been historically successful, it is limited by the inherent biases of fixed features: even though using a fixed mel-scale and a logarithmic compression works well in general, we have no guarantee that they provide the best representations for the task at hand. In particular, even though matching human perception provides good inductive biases for some application domains, e.g., speech recognition or music understanding, these biases may be detrimental to domains for which imitating the human ear is not important, such as recognizing whale calls. So, in order to achieve optimal performance, the mel filterbanks should be tailored to the task of interest, a tedious process that requires an iterative effort informed by expert domain knowledge. As a consequence, standard mel filterbanks are used for most audio classification tasks in practice, even though they are suboptimal. In addition, while researchers have proposed ML systems to address these problems, such as Time-Domain Filterbanks, SincNet and Wavegram, they have yet to match the performance of traditional mel filterbanks.

In “LEAF, A Fully Learnable Frontend for Audio Classification”, accepted at ICLR 2021, we present an alternative method for crafting learnable spectrograms for audio understanding tasks. LEarnable Audio Frontend (LEAF) is a neural network that can be initialized to approximate mel filterbanks, and then be trained jointly with any audio classifier to adapt to the task at hand, while only adding a handful of parameters to the full model. We show that over a wide range of audio signals and classification tasks, including speech, music and bird songs, LEAF spectrograms improve classification performance over fixed mel filterbanks and over previously proposed learnable systems. We have implemented the code in TensorFlow 2 and released it to the community through our GitHub repository.

Mel Filterbanks: Mimicking Human Perception of Sound
The first step in the traditional approach to creating a mel filterbank is to capture the sound’s time-variability by windowing, i.e., cutting the signal into short segments with fixed duration. Then, one performs filtering, by passing the windowed segments through a bank of fixed frequency filters, that replicate the human logarithmic sensitivity to pitch. Because we are more sensitive to variations in low frequencies than high frequencies, mel filterbanks give more importance to the low-frequency range of sounds. Finally, the audio signal is compressed to mimic the ear’s logarithmic sensitivity to loudness — a sound needs to double its power for a person to perceive an increase of 3 decibels.

LEAF loosely follows this traditional approach to mel filterbank generation, but replaces each of the fixed operations (i.e., the filtering layer, windowing layer, and compression function) by a learned counterpart. The output of LEAF is a time-frequency representation (a spectrogram) similar to mel filterbanks, but fully learnable. So, for example, while a mel filterbank uses a fixed scale for pitch, LEAF learns the scale that is best suited to the task of interest. Any model that can be trained using mel filterbanks as input features, can also be trained on LEAF spectrograms.

Diagram of computation of mel filterbanks compared to LEAF spectrograms.

While LEAF can be initialized randomly, it can also be initialized in a way that approximates mel filterbanks, which have been shown to be a better starting point. Then, LEAF can be trained with any classifier to adapt to the task of interest.

Left: Mel filterbanks for a person saying “wow”. Right: LEAF’s output for the same example, after training on a dataset of speech commands.

A Parameter-Efficient Alternative to Fixed Features
A potential downside of replacing fixed features that involve no learnable parameter with a trainable system is that it can significantly increase the number of parameters to optimize. To avoid this issue, LEAF uses Gabor convolution layers that have only two parameters per filter, instead of the ~400 parameters typical of a standard convolution layer. This way, even when paired with a small classifier, such as EfficientNetB0, the LEAF model only accounts for 0.01% of the total parameters.

Top: Unconstrained convolutional filters after training for audio event classification. Bottom: LEAF filters at convergence after training for the same task.

Performance
We apply LEAF to diverse audio classification tasks, including recognizing speech commands, speaker identification, acoustic scene recognition, identifying musical instruments, and finding birdsongs. On average, LEAF outperforms both mel filterbanks and previous learnable frontends, such as Time-Domain Filterbanks, SincNet and Wavegram. In particular, LEAF achieves a 76.9% average accuracy across the different tasks, compared to 73.9% for mel filterbanks. Moreover we show that LEAF can be trained in a multi-task setting, such that a single LEAF parametrization can work well across all these tasks. Finally, when combined with a large audio classifier, LEAF reaches state-of-the-art performance on the challenging AudioSet benchmark, with a 2.74 d-prime score.

D-prime score (the higher the better) of LEAF, mel filterbanks and previously proposed learnable spectrograms on the evaluation set of AudioSet.

Conclusion
The scope of audio understanding tasks keeps growing, from diagnosing dementia from speech to detecting humpback whale calls from underwater microphones. Adapting mel filterbanks to every new task can require a significant amount of hand-tuning and experimentation. In this context, LEAF provides a drop-in replacement for these fixed features, that can be trained to adapt to the task of interest, with minimal task-specific adjustments. Thus, we believe that LEAF can accelerate development of models for new audio understanding tasks.

Acknowledgements
We thank our co-authors, Olivier Teboul, Félix de Chaumont-Quitry and Marco Tagliasacchi. We also thank Dick Lyon, Vincent Lostanlen, Matt Harvey, and Alex Park for helpful discussions, and Julie Thomas for helping to design figures for this post.

Categories
Offsites

torch time series continued: A first go at multi-step prediction

We pick up where the first post in this series left us: confronting the task of multi-step time-series forecasting.

Our first attempt was a workaround of sorts. The model had been trained to deliver a single prediction, corresponding to the very next point in time. Thus, if we needed a longer forecast, all we could do is use that prediction and feed it back to the model, moving the input sequence by one value (from ([x_{t-n}, …, x_t]) to ([x_{t-n-1}, …, x_{t+1}]), say).

In contrast, the new model will be designed – and trained – to forecast a configurable number of observations at once. The architecture will still be basic – about as basic as possible, given the task – and thus, can serve as a baseline for later attempts.

Data input

We work with the same data as before, vic_elec from tsibbledata.

Compared to last time though, the dataset class has to change. While, previously, for each batch item the target (y) was a single value, it now is a vector, just like the input, x. And just like n_timesteps was (and still is) used to specify the length of the input sequence, there is now a second parameter, n_forecast, to configure target size.

In our example, n_timesteps and n_forecast are set to the same value, but there is no need for this to be the case. You could equally well train on week-long sequences and then forecast developments over a single day, or a month.

Apart from the fact that .getitem() now returns a vector for y as well as x, there is not much to be said about dataset creation. Here is the complete code to set up the data input pipeline:

n_timesteps <- 7 * 24 * 2
n_forecast <- 7 * 24 * 2 
batch_size <- 32

vic_elec_get_year <- function(year, month = NULL) {
  vic_elec %>%
    filter(year(Date) == year, month(Date) == if (is.null(month)) month(Date) else month) %>%
    as_tibble() %>%
    select(Demand)
}

elec_train <- vic_elec_get_year(2012) %>% as.matrix()
elec_valid <- vic_elec_get_year(2013) %>% as.matrix()
elec_test <- vic_elec_get_year(2014, 1) %>% as.matrix()

train_mean <- mean(elec_train)
train_sd <- sd(elec_train)

elec_dataset <- dataset(
  name = "elec_dataset",
  
  initialize = function(x, n_timesteps, n_forecast, sample_frac = 1) {
    
    self$n_timesteps <- n_timesteps
    self$n_forecast <- n_forecast
    self$x <- torch_tensor((x - train_mean) / train_sd)
    
    n <- length(self$x) - self$n_timesteps - self$n_forecast + 1
    
    self$starts <- sort(sample.int(
      n = n,
      size = n * sample_frac
    ))
    
  },
  
  .getitem = function(i) {
    
    start <- self$starts[i]
    end <- start + self$n_timesteps - 1
    pred_length <- self$n_forecast
    
    list(
      x = self$x[start:end],
      y = self$x[(end + 1):(end + pred_length)]$squeeze(2)
    )
    
  },
  
  .length = function() {
    length(self$starts) 
  }
)

train_ds <- elec_dataset(elec_train, n_timesteps, n_forecast, sample_frac = 0.5)
train_dl <- train_ds %>% dataloader(batch_size = batch_size, shuffle = TRUE)

valid_ds <- elec_dataset(elec_valid, n_timesteps, n_forecast, sample_frac = 0.5)
valid_dl <- valid_ds %>% dataloader(batch_size = batch_size)

test_ds <- elec_dataset(elec_test, n_timesteps, n_forecast)
test_dl <- test_ds %>% dataloader(batch_size = 1)

Model

The model replaces the single linear layer that, in the previous post, had been tasked with outputting the final prediction, with a small network, complete with two linear layers and – optional – dropout.

In forward(), we first apply the RNN, and just like in the previous post, we make use of the outputs only; or more specifically, the output corresponding to the final time step. (See that previous post for a detailed discussion of what a torch RNN returns.)

model <- nn_module(
  
  initialize = function(type, input_size, hidden_size, linear_size, output_size,
                        num_layers = 1, dropout = 0, linear_dropout = 0) {
    
    self$type <- type
    self$num_layers <- num_layers
    self$linear_dropout <- linear_dropout
    
    self$rnn <- if (self$type == "gru") {
      nn_gru(
        input_size = input_size,
        hidden_size = hidden_size,
        num_layers = num_layers,
        dropout = dropout,
        batch_first = TRUE
      )
    } else {
      nn_lstm(
        input_size = input_size,
        hidden_size = hidden_size,
        num_layers = num_layers,
        dropout = dropout,
        batch_first = TRUE
      )
    }
    
    self$mlp <- nn_sequential(
      nn_linear(hidden_size, linear_size),
      nn_relu(),
      nn_dropout(linear_dropout),
      nn_linear(linear_size, output_size)
    )
    
  },
  
  forward = function(x) {
    
    x <- self$rnn(x)
    x[[1]][ ,-1, ..] %>% 
      self$mlp()
    
  }
  
)

For model instantiation, we now have an additional configuration parameter, related to the amount of dropout between the two linear layers.

net <- model(
  "gru", input_size = 1, hidden_size = 32, linear_size = 512, output_size = n_forecast, linear_dropout = 0
  )

# training RNNs on the GPU currently prints a warning that may clutter 
# the console
# see https://github.com/mlverse/torch/issues/461
# alternatively, use 
# device <- "cpu"
device <- torch_device(if (cuda_is_available()) "cuda" else "cpu")

net <- net$to(device = device)

Training

The training procedure is completely unchanged.

optimizer <- optim_adam(net$parameters, lr = 0.001)

num_epochs <- 30

train_batch <- function(b) {
  
  optimizer$zero_grad()
  output <- net(b$x$to(device = device))
  target <- b$y$to(device = device)
  
  loss <- nnf_mse_loss(output, target)
  loss$backward()
  optimizer$step()
  
  loss$item()
}

valid_batch <- function(b) {
  
  output <- net(b$x$to(device = device))
  target <- b$y$to(device = device)
  
  loss <- nnf_mse_loss(output, target)
  loss$item()
  
}

for (epoch in 1:num_epochs) {
  
  net$train()
  train_loss <- c()
  
  coro::loop(for (b in train_dl) {
    loss <-train_batch(b)
    train_loss <- c(train_loss, loss)
  })
  
  cat(sprintf("nEpoch %d, training: loss: %3.5f n", epoch, mean(train_loss)))
  
  net$eval()
  valid_loss <- c()
  
  coro::loop(for (b in valid_dl) {
    loss <- valid_batch(b)
    valid_loss <- c(valid_loss, loss)
  })
  
  cat(sprintf("nEpoch %d, validation: loss: %3.5f n", epoch, mean(valid_loss)))
}
# Epoch 1, training: loss: 0.65737 
# 
# Epoch 1, validation: loss: 0.54586 
# 
# Epoch 2, training: loss: 0.43991 
# 
# Epoch 2, validation: loss: 0.50588 
# 
# Epoch 3, training: loss: 0.42161 
# 
# Epoch 3, validation: loss: 0.50031 
# 
# Epoch 4, training: loss: 0.41718 
# 
# Epoch 4, validation: loss: 0.48703 
# 
# Epoch 5, training: loss: 0.39498 
# 
# Epoch 5, validation: loss: 0.49572 
# 
# Epoch 6, training: loss: 0.38073 
# 
# Epoch 6, validation: loss: 0.46813 
# 
# Epoch 7, training: loss: 0.36472 
# 
# Epoch 7, validation: loss: 0.44957 
# 
# Epoch 8, training: loss: 0.35058 
# 
# Epoch 8, validation: loss: 0.44440 
# 
# Epoch 9, training: loss: 0.33880 
# 
# Epoch 9, validation: loss: 0.41995 
# 
# Epoch 10, training: loss: 0.32545 
# 
# Epoch 10, validation: loss: 0.42021 
# 
# Epoch 11, training: loss: 0.31347 
# 
# Epoch 11, validation: loss: 0.39514 
# 
# Epoch 12, training: loss: 0.29622 
# 
# Epoch 12, validation: loss: 0.38146 
# 
# Epoch 13, training: loss: 0.28006 
# 
# Epoch 13, validation: loss: 0.37754 
# 
# Epoch 14, training: loss: 0.27001 
# 
# Epoch 14, validation: loss: 0.36636 
# 
# Epoch 15, training: loss: 0.26191 
# 
# Epoch 15, validation: loss: 0.35338 
# 
# Epoch 16, training: loss: 0.25533 
# 
# Epoch 16, validation: loss: 0.35453 
# 
# Epoch 17, training: loss: 0.25085 
# 
# Epoch 17, validation: loss: 0.34521 
# 
# Epoch 18, training: loss: 0.24686 
# 
# Epoch 18, validation: loss: 0.35094 
# 
# Epoch 19, training: loss: 0.24159 
# 
# Epoch 19, validation: loss: 0.33776 
# 
# Epoch 20, training: loss: 0.23680 
# 
# Epoch 20, validation: loss: 0.33974 
# 
# Epoch 21, training: loss: 0.23070 
# 
# Epoch 21, validation: loss: 0.34069 
# 
# Epoch 22, training: loss: 0.22761 
# 
# Epoch 22, validation: loss: 0.33724 
# 
# Epoch 23, training: loss: 0.22390 
# 
# Epoch 23, validation: loss: 0.34013 
# 
# Epoch 24, training: loss: 0.22155 
# 
# Epoch 24, validation: loss: 0.33460 
# 
# Epoch 25, training: loss: 0.21820 
# 
# Epoch 25, validation: loss: 0.33755 
# 
# Epoch 26, training: loss: 0.22134 
# 
# Epoch 26, validation: loss: 0.33678 
# 
# Epoch 27, training: loss: 0.21061 
# 
# Epoch 27, validation: loss: 0.33108 
# 
# Epoch 28, training: loss: 0.20496 
# 
# Epoch 28, validation: loss: 0.32769 
# 
# Epoch 29, training: loss: 0.20223 
# 
# Epoch 29, validation: loss: 0.32969 
# 
# Epoch 30, training: loss: 0.20022 
# 
# Epoch 30, validation: loss: 0.33331 

From the way loss decreases on the training set, we conclude that, yes, the model is learning something. It probably would continue improving for quite some epochs still. We do, however, see less of an improvement on the validation set.

Naturally, now we’re curious about test-set predictions. (Remember, for testing we’re choosing the “particularly hard” month of January, 2014 – particularly hard because of a heatwave that resulted in exceptionally high demand.)

Evaluation

With no loop to be coded, evaluation now becomes pretty straightforward:

net$eval()

test_preds <- vector(mode = "list", length = length(test_dl))

i <- 1

coro::loop(for (b in test_dl) {
  
  input <- b$x
  output <- net(input$to(device = device))
  preds <- as.numeric(output)
  
  test_preds[[i]] <- preds
  i <<- i + 1
  
})

vic_elec_jan_2014 <- vic_elec %>%
  filter(year(Date) == 2014, month(Date) == 1)

test_pred1 <- test_preds[[1]]
test_pred1 <- c(rep(NA, n_timesteps), test_pred1, rep(NA, nrow(vic_elec_jan_2014) - n_timesteps - n_forecast))

test_pred2 <- test_preds[[408]]
test_pred2 <- c(rep(NA, n_timesteps + 407), test_pred2, rep(NA, nrow(vic_elec_jan_2014) - 407 - n_timesteps - n_forecast))

test_pred3 <- test_preds[[817]]
test_pred3 <- c(rep(NA, nrow(vic_elec_jan_2014) - n_forecast), test_pred3)


preds_ts <- vic_elec_jan_2014 %>%
  select(Demand) %>%
  add_column(
    mlp_ex_1 = test_pred1 * train_sd + train_mean,
    mlp_ex_2 = test_pred2 * train_sd + train_mean,
    mlp_ex_3 = test_pred3 * train_sd + train_mean) %>%
  pivot_longer(-Time) %>%
  update_tsibble(key = name)


preds_ts %>%
  autoplot() +
  scale_colour_manual(values = c("#08c5d1", "#00353f", "#ffbf66", "#d46f4d")) +
  theme_minimal()
One-week-ahead predictions for January, 2014.

(#fig:unnamed-chunk-6)One-week-ahead predictions for January, 2014.

Compare this to the forecast obtained by feeding back predictions. The demand profiles over the day look a lot more realistic now. How about the phases of extreme demand? Evidently, these are not reflected in the forecast, not any more than in the “loop technique”. In fact, the forecast allows for interesting insights into this model’s personality: Apparently, it really likes fluctuating around the mean – “prime” it with inputs that oscillate around a significantly higher level, and it will quickly shift back to its comfort zone.

Discussion

Seeing how, above, we provided an option to use dropout inside the MLP, you may be wondering if this would help with forecasts on the test set. Turns out it did not, in my experiments. Maybe this is not so strange either: How, absent external cues (temperature), should the network know that high demand is coming up?

In our analysis, we can make an additional distinction. With the first week of predictions, what we see is a failure to anticipate something that could not reasonably have been anticipated (two, or two-and-a-half, say, days of exceptionally high demand). In the second, all the network would have had to do was stay at the current, elevated level. It will be interesting to see how this is handled by the architectures we discuss next.

Finally, an additional idea you may have had is – what if we used temperature as a second input variable? As a matter of fact, training performance indeed improved, but no performance impact was observed on the validation and test sets. Still, you may find the code useful – it is easily extended to datasets with more predictors. Therefore, we reproduce it in the appendix.

Thanks for reading!

Appendix

# Data input code modified to accommodate two predictors

n_timesteps <- 7 * 24 * 2
n_forecast <- 7 * 24 * 2

vic_elec_get_year <- function(year, month = NULL) {
  vic_elec %>%
    filter(year(Date) == year, month(Date) == if (is.null(month)) month(Date) else month) %>%
    as_tibble() %>%
    select(Demand, Temperature)
}

elec_train <- vic_elec_get_year(2012) %>% as.matrix()
elec_valid <- vic_elec_get_year(2013) %>% as.matrix()
elec_test <- vic_elec_get_year(2014, 1) %>% as.matrix()

train_mean_demand <- mean(elec_train[ , 1])
train_sd_demand <- sd(elec_train[ , 1])

train_mean_temp <- mean(elec_train[ , 2])
train_sd_temp <- sd(elec_train[ , 2])

elec_dataset <- dataset(
  name = "elec_dataset",
  
  initialize = function(data, n_timesteps, n_forecast, sample_frac = 1) {
    
    demand <- (data[ , 1] - train_mean_demand) / train_sd_demand
    temp <- (data[ , 2] - train_mean_temp) / train_sd_temp
    self$x <- cbind(demand, temp) %>% torch_tensor()
    
    self$n_timesteps <- n_timesteps
    self$n_forecast <- n_forecast
    
    n <- nrow(self$x) - self$n_timesteps - self$n_forecast + 1
    self$starts <- sort(sample.int(
      n = n,
      size = n * sample_frac
    ))
    
  },
  
  .getitem = function(i) {
    
    start <- self$starts[i]
    end <- start + self$n_timesteps - 1
    pred_length <- self$n_forecast
    
    list(
      x = self$x[start:end, ],
      y = self$x[(end + 1):(end + pred_length), 1]
    )
    
  },
  
  .length = function() {
    length(self$starts)
  }
  
)

### rest identical to single-predictor code above

Photo by Monica Bourgeau on Unsplash

Categories
Offsites

Introductory time series forecasting with torch

This is the first post in a series introducing time-series forecasting with torch. It does assume some prior experience with torch and/or deep learning. But as far as time series are concerned, it starts right from the beginning, using recurrent neural networks (GRU or LSTM) to predict how something develops in time.

In this post, we build a network that uses a sequence of observations to predict a value for the very next point in time. What if we’d like to forecast a sequence of values, corresponding to, say, a week or a month of measurements?

One thing we could do is feed back into the system the previously forecasted value; this is something we’ll try at the end of this post. Subsequent posts will explore other options, some of them involving significantly more complex architectures. It will be interesting to compare their performances; but the essential goal is to introduce some torch “recipes” that you can apply to your own data.

We start by examining the dataset used. It is a low-dimensional, but pretty polyvalent and complex one.

Time-series inspection

The vic_elec dataset, available through package tsibbledata, provides three years of half-hourly electricity demand for Victoria, Australia, augmented by same-resolution temperature information and a daily holiday indicator.

library(tidyverse)
library(lubridate)

library(tsibble) # Tidy Temporal Data Frames and Tools
library(feasts) # Feature Extraction and Statistics for Time Series
library(tsibbledata) # Diverse Datasets for 'tsibble'

vic_elec %>% glimpse()
Rows: 52,608
Columns: 5
$ Time        <dttm> 2012-01-01 00:00:00, 2012-01-01 00:30:00, 2012-01-01 01:00:00,…
$ Demand      <dbl> 4382.825, 4263.366, 4048.966, 3877.563, 4036.230, 3865.597, 369…
$ Temperature <dbl> 21.40, 21.05, 20.70, 20.55, 20.40, 20.25, 20.10, 19.60, 19.10, …
$ Date        <date> 2012-01-01, 2012-01-01, 2012-01-01, 2012-01-01, 2012-01-01, 20…
$ Holiday     <lgl> TRUE, TRUE, TRUE, TRUE, TRUE, TRUE, TRUE, TRUE, TRUE, TRUE, TRU…

Depending on what subset of variables is used, and whether and how data is temporally aggregated, these data may serve to illustrate a variety of different techniques. For example, in the third edition of Forecasting: Principles and Practice daily averages are used to teach quadratic regression with ARMA errors. In this first introductory post though, as well as in most of its successors, we’ll attempt to forecast Demand without relying on additional information, and we keep the original resolution.

To get an impression of how electricity demand varies over different timescales. Let’s inspect data for two months that nicely illustrate the U-shaped relationship between temperature and demand: January, 2014 and July, 2014.

First, here is July.

vic_elec_2014 <-  vic_elec %>%
  filter(year(Date) == 2014) %>%
  select(-c(Date, Holiday)) %>%
  mutate(Demand = scale(Demand), Temperature = scale(Temperature)) %>%
  pivot_longer(-Time, names_to = "variable") %>%
  update_tsibble(key = variable)

vic_elec_2014 %>% filter(month(Time) == 7) %>% 
  autoplot() + 
  scale_colour_manual(values = c("#08c5d1", "#00353f")) +
  theme_minimal()
Temperature and electricity demand (normalized). Victoria, Australia, 07/2014.

(#fig:unnamed-chunk-3)Temperature and electricity demand (normalized). Victoria, Australia, 07/2014.

It’s winter; temperature fluctuates below average, while electricity demand is above average (heating). There is strong variation over the course of the day; we see troughs in the demand curve corresponding to ridges in the temperature graph, and vice versa. While diurnal variation dominates, there also is variation over the days of the week. Between weeks though, we don’t see much difference.

Compare this with the data for January:

vic_elec_2014 %>% filter(month(Time) == 1) %>% 
  autoplot() + 
  scale_colour_manual(values = c("#08c5d1", "#00353f")) +
  theme_minimal()
Temperature and electricity demand (normalized). Victoria, Australia, 01/2014.

(#fig:unnamed-chunk-5)Temperature and electricity demand (normalized). Victoria, Australia, 01/2014.

We still see the strong circadian variation. We still see some day-of-week variation. But now it is high temperatures that cause elevated demand (cooling). Also, there are two periods of unusually high temperatures, accompanied by exceptional demand. We anticipate that in a univariate forecast, not taking into account temperature, this will be hard – or even, impossible – to forecast.

Let’s see a concise portrait of how Demand behaves using feasts::STL(). First, here is the decomposition for July:

vic_elec_2014 <-  vic_elec %>%
  filter(year(Date) == 2014) %>%
  select(-c(Date, Holiday))

cmp <- vic_elec_2014 %>% filter(month(Time) == 7) %>%
  model(STL(Demand)) %>% 
  components()

cmp %>% autoplot()
STL decomposition of electricity demand. Victoria, Australia, 07/2014.

(#fig:unnamed-chunk-7)STL decomposition of electricity demand. Victoria, Australia, 07/2014.

And here, for January:

STL decomposition of electricity demand. Victoria, Australia, 01/2014.

(#fig:unnamed-chunk-8)STL decomposition of electricity demand. Victoria, Australia, 01/2014.

Both nicely illustrate the strong circadian and weekly seasonalities (with diurnal variation substantially stronger in January). If we look closely, we can even see how the trend component is more influential in January than in July. This again hints at much stronger difficulties predicting the January than the July developments.

Now that we have an idea what awaits us, let’s begin by creating a torch dataset.

Data input

Here is what we intend to do. We want to start our journey into forecasting by using a sequence of observations to predict their immediate successor. In other words, the input (x) for each batch item is a vector, while the target (y) is a single value. The length of the input sequence, x, is parameterized as n_timesteps, the number of consecutive observations to extrapolate from.

The dataset will reflect this in its .getitem() method. When asked for the observations at index i, it will return tensors like so:

list(
      x = self$x[start:end],
      y = self$x[end+1]
)

where start:end is a vector of indices, of length n_timesteps, and end+1 is a single index.

Now, if the dataset just iterated over its input in order, advancing the index one at a time, these lines could simply read

list(
      x = self$x[i:(i + self$n_timesteps - 1)],
      y = self$x[self$n_timesteps + 1]
)

Since many sequences in the data are similar, we can reduce training time by making use of a fraction of the data in every epoch. This can be accomplished by (optionally) passing a sample_frac smaller than 1. In initialize(), a random set of start indices is prepared; .getitem() then just does what it normally does: look for the (x,y) pair at a given index.

Here is the complete dataset code:

elec_dataset <- dataset(
  name = "elec_dataset",
  
  initialize = function(x, n_timesteps, sample_frac = 1) {

    self$n_timesteps <- n_timesteps
    self$x <- torch_tensor((x - train_mean) / train_sd)
    
    n <- length(self$x) - self$n_timesteps 
    
    self$starts <- sort(sample.int(
      n = n,
      size = n * sample_frac
    ))

  },
  
  .getitem = function(i) {
    
    start <- self$starts[i]
    end <- start + self$n_timesteps - 1
    
    list(
      x = self$x[start:end],
      y = self$x[end + 1]
    )

  },
  
  .length = function() {
    length(self$starts) 
  }
)

You may have noticed that we normalize the data by globally defined train_mean and train_sd. We yet have to calculate those.

The way we split the data is straightforward. We use the whole of 2012 for training, and all of 2013 for validation. For testing, we take the “difficult” month of January, 2014. You are invited to compare testing results for July that same year, and compare performances.

vic_elec_get_year <- function(year, month = NULL) {
  vic_elec %>%
    filter(year(Date) == year, month(Date) == if (is.null(month)) month(Date) else month) %>%
    as_tibble() %>%
    select(Demand)
}

elec_train <- vic_elec_get_year(2012) %>% as.matrix()
elec_valid <- vic_elec_get_year(2013) %>% as.matrix()
elec_test <- vic_elec_get_year(2014, 1) %>% as.matrix() # or 2014, 7, alternatively

train_mean <- mean(elec_train)
train_sd <- sd(elec_train)

Now, to instantiate a dataset, we still need to pick sequence length. From prior inspection, a week seems like a sensible choice.

n_timesteps <- 7 * 24 * 2 # days * hours * half-hours

Now we can go ahead and create a dataset for the training data. Let’s say we’ll make use of 50% of the data in each epoch:

train_ds <- elec_dataset(elec_train, n_timesteps, sample_frac = 0.5)
length(train_ds)
 8615

Quick check: Are the shapes correct?

train_ds[1]
$x
torch_tensor
-0.4141
-0.5541
[...]       ### lines removed by me
 0.8204
 0.9399
... [the output was truncated (use n=-1 to disable)]
[ CPUFloatType{336,1} ]

$y
torch_tensor
-0.6771
[ CPUFloatType{1} ]

Yes: This is what we wanted to see. The input sequence has n_timesteps values in the first dimension, and a single one in the second, corresponding to the only feature present, Demand. As intended, the prediction tensor holds a single value, corresponding– as we know – to n_timesteps+1.

That takes care of a single input-output pair. As usual, batching is arranged for by torch’s dataloader class. We instantiate one for the training data, and immediately again verify the outcome:

batch_size <- 32
train_dl <- train_ds %>% dataloader(batch_size = batch_size, shuffle = TRUE)
length(train_dl)

b <- train_dl %>% dataloader_make_iter() %>% dataloader_next()
b
$x
torch_tensor
(1,.,.) = 
  0.4805
  0.3125
[...]       ### lines removed by me
 -1.1756
 -0.9981
... [the output was truncated (use n=-1 to disable)]
[ CPUFloatType{32,336,1} ]

$y
torch_tensor
 0.1890
 0.5405
[...]       ### lines removed by me
 2.4015
 0.7891
... [the output was truncated (use n=-1 to disable)]
[ CPUFloatType{32,1} ]

We see the added batch dimension in front, resulting in overall shape (batch_size, n_timesteps, num_features). This is the format expected by the model, or more precisely, by its initial RNN layer.

Before we go on, let’s quickly create datasets and dataloaders for validation and test data, as well.

valid_ds <- elec_dataset(elec_valid, n_timesteps, sample_frac = 0.5)
valid_dl <- valid_ds %>% dataloader(batch_size = batch_size)

test_ds <- elec_dataset(elec_test, n_timesteps)
test_dl <- test_ds %>% dataloader(batch_size = 1)

Model

The model consists of an RNN – of type GRU or LSTM, as per the user’s choice – and an output layer. The RNN does most of the work; the single-neuron linear layer that outputs the prediction compresses its vector input to a single value.

Here, first, is the model definition.

model <- nn_module(
  
  initialize = function(type, input_size, hidden_size, num_layers = 1, dropout = 0) {
    
    self$type <- type
    self$num_layers <- num_layers
    
    self$rnn <- if (self$type == "gru") {
      nn_gru(
        input_size = input_size,
        hidden_size = hidden_size,
        num_layers = num_layers,
        dropout = dropout,
        batch_first = TRUE
      )
    } else {
      nn_lstm(
        input_size = input_size,
        hidden_size = hidden_size,
        num_layers = num_layers,
        dropout = dropout,
        batch_first = TRUE
      )
    }
    
    self$output <- nn_linear(hidden_size, 1)
    
  },
  
  forward = function(x) {
    
    # list of [output, hidden]
    # we use the output, which is of size (batch_size, n_timesteps, hidden_size)
    x <- self$rnn(x)[[1]]
    
    # from the output, we only want the final timestep
    # shape now is (batch_size, hidden_size)
    x <- x[ , dim(x)[2], ]
    
    # feed this to a single output neuron
    # final shape then is (batch_size, 1)
    x %>% self$output() 
  }
  
)

Most importantly, this is what happens in forward().

  1. The RNN returns a list. The list holds two tensors, an output, and a synopsis of hidden states. We discard the state tensor, and keep the output only. The distinction between state and output, or rather, the way it is reflected in what a torch RNN returns, deserves to be inspected more closely. We’ll do that in a second.

    x <- self$rnn(x)[[1]]
    
  2. Of the output tensor, we’re interested in only the final time-step, though.

    x <- x[ , dim(x)[2], ]
    
  3. Only this one, thus, is passed to the output layer.

    x %>% self$output()
    
  4. Finally, the said output layer’s output is returned.

Now, a bit more on states vs. outputs. Consider Fig. 1, from Goodfellow, Bengio, and Courville (2016).

Source: Goodfellow et al., Deep learning. Chapter URL: https://www.deeplearningbook.org/contents/rnn.html.

(#fig:unnamed-chunk-22)Source: Goodfellow et al., Deep learning. Chapter URL: https://www.deeplearningbook.org/contents/rnn.html.

Let’s pretend there are three time steps only, corresponding to (t-1), (t), and (t+1). The input sequence, accordingly, is composed of (x_{t-1}), (x_{t}), and (x_{t+1}).

At each (t), a hidden state is generated, and so is an output. Normally, if our goal is to predict (y_{t+2}), that is, the very next observation, we want to take into account the complete input sequence. Put differently, we want to have run through the complete machinery of state updates. The logical thing to do would thus be to choose (o_{t+1}), for either direct return from forward() or for further processing.

Indeed, return (o_{t+1}) is what a Keras LSTM or GRU would do by default.1 Not so its torch counterparts. In torch, the output tensor comprises all of (o). This is why, in step two above, we select the single time step we’re interested in – namely, the last one.

In later posts, we will make use of more than the last time step. Sometimes, we’ll use the sequence of hidden states (the (h)s) instead of the outputs (the (o)s). So you may feel like asking, what if we used (h_{t+1}) here instead of (o_{t+1})? The answer is: With a GRU, this would not make a difference, as those two are identical. With LSTM though, it would, as LSTM keeps a second, namely, the “cell”, state2.

On to initialize(). For ease of experimentation, we instantiate either a GRU or an LSTM based on user input. Two things are worth noting:

  • We pass batch_first = TRUE when creating the RNNs. This is required with torch RNNs when we want to consistently have batch items stacked in the first dimension. And we do want that; it is arguably less confusing than a change of dimension semantics for one sub-type of module.

  • num_layers can be used to build a stacked RNN, corresponding to what you’d get in Keras when chaining two GRUs/LSTMs (the first one created with return_sequences = TRUE). This parameter, too, we’ve included for quick experimentation.

Let’s instantiate a model for training. It will be a single-layer GRU with thirty-two units.

# training RNNs on the GPU currently prints a warning that may clutter 
# the console
# see https://github.com/mlverse/torch/issues/461
# alternatively, use 
# device <- "cpu"
device <- torch_device(if (cuda_is_available()) "cuda" else "cpu")

net <- model("gru", 1, 32)
net <- net$to(device = device)

Training

After all those RNN specifics, the training process is completely standard.

optimizer <- optim_adam(net$parameters, lr = 0.001)

num_epochs <- 30

train_batch <- function(b) {
  
  optimizer$zero_grad()
  output <- net(b$x$to(device = device))
  target <- b$y$to(device = device)
  
  loss <- nnf_mse_loss(output, target)
  loss$backward()
  optimizer$step()
  
  loss$item()
}

valid_batch <- function(b) {
  
  output <- net(b$x$to(device = device))
  target <- b$y$to(device = device)
  
  loss <- nnf_mse_loss(output, target)
  loss$item()
  
}

for (epoch in 1:num_epochs) {
  
  net$train()
  train_loss <- c()
  
  coro::loop(for (b in train_dl) {
    loss <-train_batch(b)
    train_loss <- c(train_loss, loss)
  })
  
  cat(sprintf("nEpoch %d, training: loss: %3.5f n", epoch, mean(train_loss)))
  
  net$eval()
  valid_loss <- c()
  
  coro::loop(for (b in valid_dl) {
    loss <- valid_batch(b)
    valid_loss <- c(valid_loss, loss)
  })
  
  cat(sprintf("nEpoch %d, validation: loss: %3.5f n", epoch, mean(valid_loss)))
}
Epoch 1, training: loss: 0.21908 

Epoch 1, validation: loss: 0.05125 

Epoch 2, training: loss: 0.03245 

Epoch 2, validation: loss: 0.03391 

Epoch 3, training: loss: 0.02346 

Epoch 3, validation: loss: 0.02321 

Epoch 4, training: loss: 0.01823 

Epoch 4, validation: loss: 0.01838 

Epoch 5, training: loss: 0.01522 

Epoch 5, validation: loss: 0.01560 

Epoch 6, training: loss: 0.01315 

Epoch 6, validation: loss: 0.01374 

Epoch 7, training: loss: 0.01205 

Epoch 7, validation: loss: 0.01200 

Epoch 8, training: loss: 0.01155 

Epoch 8, validation: loss: 0.01157 

Epoch 9, training: loss: 0.01118 

Epoch 9, validation: loss: 0.01096 

Epoch 10, training: loss: 0.01070 

Epoch 10, validation: loss: 0.01132 

Epoch 11, training: loss: 0.01003 

Epoch 11, validation: loss: 0.01150 

Epoch 12, training: loss: 0.00943 

Epoch 12, validation: loss: 0.01106 

Epoch 13, training: loss: 0.00922 

Epoch 13, validation: loss: 0.01069 

Epoch 14, training: loss: 0.00862 

Epoch 14, validation: loss: 0.01125 

Epoch 15, training: loss: 0.00842 

Epoch 15, validation: loss: 0.01095 

Epoch 16, training: loss: 0.00820 

Epoch 16, validation: loss: 0.00975 

Epoch 17, training: loss: 0.00802 

Epoch 17, validation: loss: 0.01120 

Epoch 18, training: loss: 0.00781 

Epoch 18, validation: loss: 0.00990 

Epoch 19, training: loss: 0.00757 

Epoch 19, validation: loss: 0.01017 

Epoch 20, training: loss: 0.00735 

Epoch 20, validation: loss: 0.00932 

Epoch 21, training: loss: 0.00723 

Epoch 21, validation: loss: 0.00901 

Epoch 22, training: loss: 0.00708 

Epoch 22, validation: loss: 0.00890 

Epoch 23, training: loss: 0.00676 

Epoch 23, validation: loss: 0.00914 

Epoch 24, training: loss: 0.00666 

Epoch 24, validation: loss: 0.00922 

Epoch 25, training: loss: 0.00644 

Epoch 25, validation: loss: 0.00869 

Epoch 26, training: loss: 0.00620 

Epoch 26, validation: loss: 0.00902 

Epoch 27, training: loss: 0.00588 

Epoch 27, validation: loss: 0.00896 

Epoch 28, training: loss: 0.00563 

Epoch 28, validation: loss: 0.00886 

Epoch 29, training: loss: 0.00547 

Epoch 29, validation: loss: 0.00895 

Epoch 30, training: loss: 0.00523 

Epoch 30, validation: loss: 0.00935 

Loss decreases quickly, and we don’t seem to be overfitting on the validation set.

Numbers are pretty abstract, though. So, we’ll use the test set to see how the forecast actually looks.

Evaluation

Here is the forecast for January, 2014, thirty minutes at a time.

net$eval()

preds <- rep(NA, n_timesteps)

coro::loop(for (b in test_dl) {
  output <- net(b$x$to(device = device))
  preds <- c(preds, output %>% as.numeric())
})

vic_elec_jan_2014 <-  vic_elec %>%
  filter(year(Date) == 2014, month(Date) == 1) %>%
  select(Demand)

preds_ts <- vic_elec_jan_2014 %>%
  add_column(forecast = preds * train_sd + train_mean) %>%
  pivot_longer(-Time) %>%
  update_tsibble(key = name)

preds_ts %>%
  autoplot() +
  scale_colour_manual(values = c("#08c5d1", "#00353f")) +
  theme_minimal()
One-step-ahead predictions for January, 2014.

(#fig:unnamed-chunk-26)One-step-ahead predictions for January, 2014.

Overall, the forecast is excellent, but it is interesting to see how the forecast “regularizes” the most extreme peaks. This kind of “regression to the mean” will be seen much more strongly in later setups, when we try to forecast further into the future.

Can we use our current architecture for multi-step prediction? We can.

One thing we can do is feed back the current prediction, that is, append it to the input sequence as soon as it is available. Effectively thus, for each batch item, we obtain a sequence of predictions in a loop.

We’ll try to forecast 336 time steps, that is, a complete week.

n_forecast <- 2 * 24 * 7

test_preds <- vector(mode = "list", length = length(test_dl))

i <- 1

coro::loop(for (b in test_dl) {
  
  input <- b$x
  output <- net(input$to(device = device))
  preds <- as.numeric(output)
  
  for(j in 2:n_forecast) {
    input <- torch_cat(list(input[ , 2:length(input), ], output$view(c(1, 1, 1))), dim = 2)
    output <- net(input$to(device = device))
    preds <- c(preds, as.numeric(output))
  }
  
  test_preds[[i]] <- preds
  i <<- i + 1
  
})

For visualization, let’s pick three non-overlapping sequences.

test_pred1 <- test_preds[[1]]
test_pred1 <- c(rep(NA, n_timesteps), test_pred1, rep(NA, nrow(vic_elec_jan_2014) - n_timesteps - n_forecast))

test_pred2 <- test_preds[[408]]
test_pred2 <- c(rep(NA, n_timesteps + 407), test_pred2, rep(NA, nrow(vic_elec_jan_2014) - 407 - n_timesteps - n_forecast))

test_pred3 <- test_preds[[817]]
test_pred3 <- c(rep(NA, nrow(vic_elec_jan_2014) - n_forecast), test_pred3)


preds_ts <- vic_elec %>%
  filter(year(Date) == 2014, month(Date) == 1) %>%
  select(Demand) %>%
  add_column(
    iterative_ex_1 = test_pred1 * train_sd + train_mean,
    iterative_ex_2 = test_pred2 * train_sd + train_mean,
    iterative_ex_3 = test_pred3 * train_sd + train_mean) %>%
  pivot_longer(-Time) %>%
  update_tsibble(key = name)

preds_ts %>%
  autoplot() +
  scale_colour_manual(values = c("#08c5d1", "#00353f", "#ffbf66", "#d46f4d")) +
  theme_minimal()
Multi-step predictions for January, 2014, obtained in a loop.

(#fig:unnamed-chunk-29)Multi-step predictions for January, 2014, obtained in a loop.

Even with this very basic forecasting technique, the diurnal rhythm is preserved, albeit in a strongly smoothed form. There even is an apparent day-of-week periodicity in the forecast. We do see, however, very strong regression to the mean, even in loop instances where the network was “primed” with a higher input sequence.

Conclusion

Hopefully this post provided a useful introduction to time series forecasting with torch. Evidently, we picked a challenging time series – challenging, that is, for at least two reasons:

  • To correctly factor in the trend, external information is needed: external information in form of a temperature forecast, which, “in reality”, would be easily obtainable.

  • In addition to the highly important trend component, the data are characterized by multiple levels..

Categories
Offsites

A New Lens on Understanding Generalization in Deep Learning

Understanding generalization is one of the fundamental unsolved problems in deep learning. Why does optimizing a model on a finite set of training data lead to good performance on a held-out test set? This problem has been studied extensively in machine learning, with a rich history going back more than 50 years. There are now many mathematical tools that help researchers understand generalization in certain models. Unfortunately, most of these existing theories fail when applied to modern deep networks — they are both vacuous and non-predictive in realistic settings. This gap between theory and practice is largest for overparameterized models, which in theory have the capacity to overfit their train sets, but often do not in practice.

In “The Deep Bootstrap Framework: Good Online Learners are Good Offline Generalizers”, accepted at ICLR 2021, we present a new framework for approaching this problem by connecting generalization to the field of online optimization. In a typical setting, a model trains on a finite set of samples, which are reused for multiple epochs. But in online optimization, the model has access to an infinite stream of samples, and can be iteratively updated while processing this stream. In this work, we find that models that train quickly on infinite data are the same models that generalize well if they are instead trained on finite data. This connection brings new perspectives on design choices in practice, and lays a roadmap for understanding generalization from a theoretical perspective.

The Deep Bootstrap Framework
The main idea of the Deep Bootstrap framework is to compare the real world, where there is finite training data, to an “ideal world”, where there is infinite data. We define these as:

  • Real World (N, T): Train a model on N train samples from a distribution, for T minibatch stochastic gradient descent (SGD) steps, re-using the same N samples in multiple epochs, as usual. This corresponds to running SGD on the empirical loss (loss on training data), and is the standard training procedure in supervised learning.
  • Ideal World (T): Train the same model for T steps, but use fresh samples from the distribution in each SGD step. That is, we run the exact same training code (same optimizer, learning-rates, batch-size, etc.), but sample a fresh train set in each epoch instead of reusing samples. In this ideal world setting, with an effectively infinite “train set”, there is no difference between train error and test error.
Test soft-error for ideal world and real world during SGD iterations for ResNet-18 architecture. We see that the two errors are similar.

A priori, one might expect the real and ideal worlds may have nothing to do with each other, since in the real world the model sees a finite number of examples from the distribution while in the ideal world the model sees the whole distribution. But in practice, we found that the real and ideal models actually have similar test error.

In order to quantify this observation, we simulated an ideal world setting by creating a new dataset, which we call CIFAR-5m. We trained a generative model on CIFAR-10, which we then used to generate ~6 million images. The scale of the dataset was chosen to ensure that it is “virtually infinite” from the model’s perspective, so that the model never resamples the same data. That is, in the ideal world, the model sees an entirely fresh set of samples.

Samples from CIFAR-5m

The figure below presents the test error of several models, comparing their performance when trained on CIFAR-5m data in the real world setting (i.e., re-used data) and the ideal world (“fresh” data). The solid blue line shows a ResNet model in the real world, trained on 50K samples for 100 epochs with standard CIFAR-10 hyperparameters. The dashed blue line shows the corresponding model in the ideal world, trained on 5 million samples in a single pass. Surprisingly, these worlds have very similar test error — the model in some sense “doesn’t care” whether it sees re-used samples or fresh ones.

The real world model is trained on 50K samples for 100 epochs, and the ideal world model is trained on 5M samples for a single epoch. The lines show the test error vs. the number of SGD steps.

This also holds for other architectures, e.g., a Multi-Layer-Perceptron (red), a Vision Transformer (green), and across many other settings of architecture, optimizer, data distribution, and sample size. These experiments suggest a new perspective on generalization: models that optimize quickly (on infinite data), generalize well (on finite data). For example, the ResNet model generalizes better than the MLP model on finite data, but this is “because” it optimizes faster even on infinite data.

Understanding Generalization from Optimization Behavior
The key observation is that real world and ideal world models remain close, in test error, for all timesteps, until the real world converges (< 1% train error). Thus, one can study models in the real world by studying their corresponding behavior in the ideal world.

This means that the generalization of the model can be understood in terms of its optimization performance under two frameworks:

  1. Online Optimization: How fast the ideal world test error decreases
  2. Offline Optimization: How fast the real world train error converges

Thus, to study generalization, we can equivalently study the two terms above, which can be conceptually simpler, since they only involve optimization concerns. Based on this observation, good models and training procedures are those that (1) optimize quickly in the ideal world and (2) do not optimize too quickly in the real world.

All design choices in deep learning can be viewed through their effect on these two terms. For example, some advances like convolutions, skip-connections, and pretraining help primarily by accelerating ideal world optimization, while other advances like regularization and data-augmentation help primarily by decelerating real world optimization.

Applying the Deep Bootstrap Framework
Researchers can use the Deep Bootstrap framework to study and guide design choices in deep learning. The principle is: whenever one makes a change that affects generalization in the real world (the architecture, learning-rate, etc.), one should consider its effect on (1) the ideal world optimization of test error (faster is better) and (2) the real world optimization of train error (slower is better).

For example, pre-training is often used in practice to help generalization of models in small-data regimes. However, the reason that pre-training helps remains poorly understood. One can study this using the Deep Bootstrap framework by looking at the effect of pre-training on terms (1) and (2) above. We find that the primary effect of pre-training is to improve the ideal world optimization (1) — pre-training turns the network into a “fast learner” for online optimization. The improved generalization of pretrained models is thus almost exactly captured by their improved optimization in the ideal world. The figure below shows this for Vision-Transformers (ViT) trained on CIFAR-10, comparing training from scratch vs. pre-training on ImageNet.

Effect of pre-training — pre-trained ViTs optimize faster in the ideal world.

One can also study data-augmentation using this framework. Data-augmentation in the ideal world corresponds to augmenting each fresh sample once, as opposed to augmenting the same sample multiple times. This framework implies that good data-augmentations are those that (1) do not significantly harm ideal world optimization (i.e., augmented samples don’t look too “out of distribution”) or (2) inhibit real world optimization speed (so the real world takes longer to fit its train set).

The main benefit of data-augmentation is through the second term, prolonging the real world optimization time. As for the first term, some aggressive data augmentations (mixup/cutout) can actually harm the ideal world, but this effect is dwarfed by the second term.

Concluding Thoughts
The Deep Bootstrap framework provides a new lens on generalization and empirical phenomena in deep learning. We are excited to see it applied to understand other aspects of deep learning in the future. It is especially interesting that generalization can be characterized via purely optimization considerations, which is in contrast to many prevailing approaches in theory. Crucially, we consider both online and offline optimization, which are individually insufficient, but that together determine generalization.

The Deep Bootstrap framework can also shed light on why deep learning is fairly robust to many design choices: many kinds of architectures, loss functions, optimizers, normalizations, and activation functions can generalize well. This framework suggests a unifying principle: that essentially any choice that works well in the online optimization setting will also generalize well in the offline setting.

Finally, modern neural networks can be either overparameterized (e.g., large networks trained on small data tasks) or underparmeterized (e.g., OpenAI’s GPT-3, Google’s T5, or Facebook’s ResNeXt WSL). The Deep Bootstrap framework implies that online optimization is a crucial factor to success in both regimes.

Acknowledgements
We are thankful to our co-author, Behnam Neyshabur, for his great contributions to the paper and valuable feedback on the blog. We thank Boaz Barak, Chenyang Yuan, and Chiyuan Zhang for helpful comments on the blog and paper.